Some of the scariest words that you can say to a professional machine quilter are, “That will quilt out, right? It usually means that I am going to have to get creative with the quilting to make the quilt flat.
Even though it can be scary to hear, the truth is that some piecing mistakes will quilt out. With a little gentle stretching or fabric maneuvering, the quilting can hide mistakes or even “suck up” extra fabric. Over the years, I have gotten skilled at managing unruly tops.
In fact, the very moment that I got my longarm quilting machine, Grandpa handed me a stack of quilt tops that he had acquired from various thrift shops, flea markets and garage sales. These quilts were…..special. They were lovingly made, perhaps with more love than skill. It was those quilts that began to teach me how to “quilt out” some mistakes.
For the longest time, I have wanted to put together a blog post about you can “quilt out” some of your mistakes. But I hesitated for obvious reasons. Pointing out a customer’s piecing mistakes on my website isn’t necessarily the best business plan.
Finally, though, a perfect opportunity presented itself. Last week I started on a quilt top by the worst piecer that I have ever quilted for. Every time one of her quilts is on my machine, I know that I am going to have to deal with some piecing problems. If you keep it a secret, I will tell you who it is………………..It’s me, of course! I may be good at machine quilting, but my sewing skills leave a lot to be desired. What can I say? When I am piecing, I am trying to quickly get to my favorite part….the quilting!!!
Here’s what I was dealing with. I am not sure what I did wrong, but it’s obvious that it needs a little help. The pieced border isn’t straight, as you can tell by the wrinkles. I call these friendly borders because they wave at me when I walk in the room.

If you have some friendly borders on your quilts, here are some tips to help you manage the quilting for the best possible result.
-
Use a serpentine line to secure the edge of the borders.

Sewing straight across the edge of the quilt will push all the fullness to one side which will result in tucks. Instead, I quilted so that it went on and off the edge to hold the fullness in place for now. My goal was to keep the fullness evenly spread out.
You don’t have to sew down the edge of course, but I am trying to keep the quilt square and doing this helps make sure that happens.
2. Start quilting the design, trying to avoid tucks.

The whole time I am quilting, I am trying to keep the fabric from getting a tuck. Sometimes, it isn’t possible. If I have to allow a tuck to happen, I try to keep it where it will be less noticeable. In this example, I’d rather a tuck in the filler. That means, as I am quilting the feather, I am pushing the fabric in whatever direction I need to prevent a tuck from happening.

You can see the fullness in the fabric around the feather. I had to deal with that later, but at that time, I was only paying attention to the feather.
3. Use the filler to “suck up” fullness in the fabric.
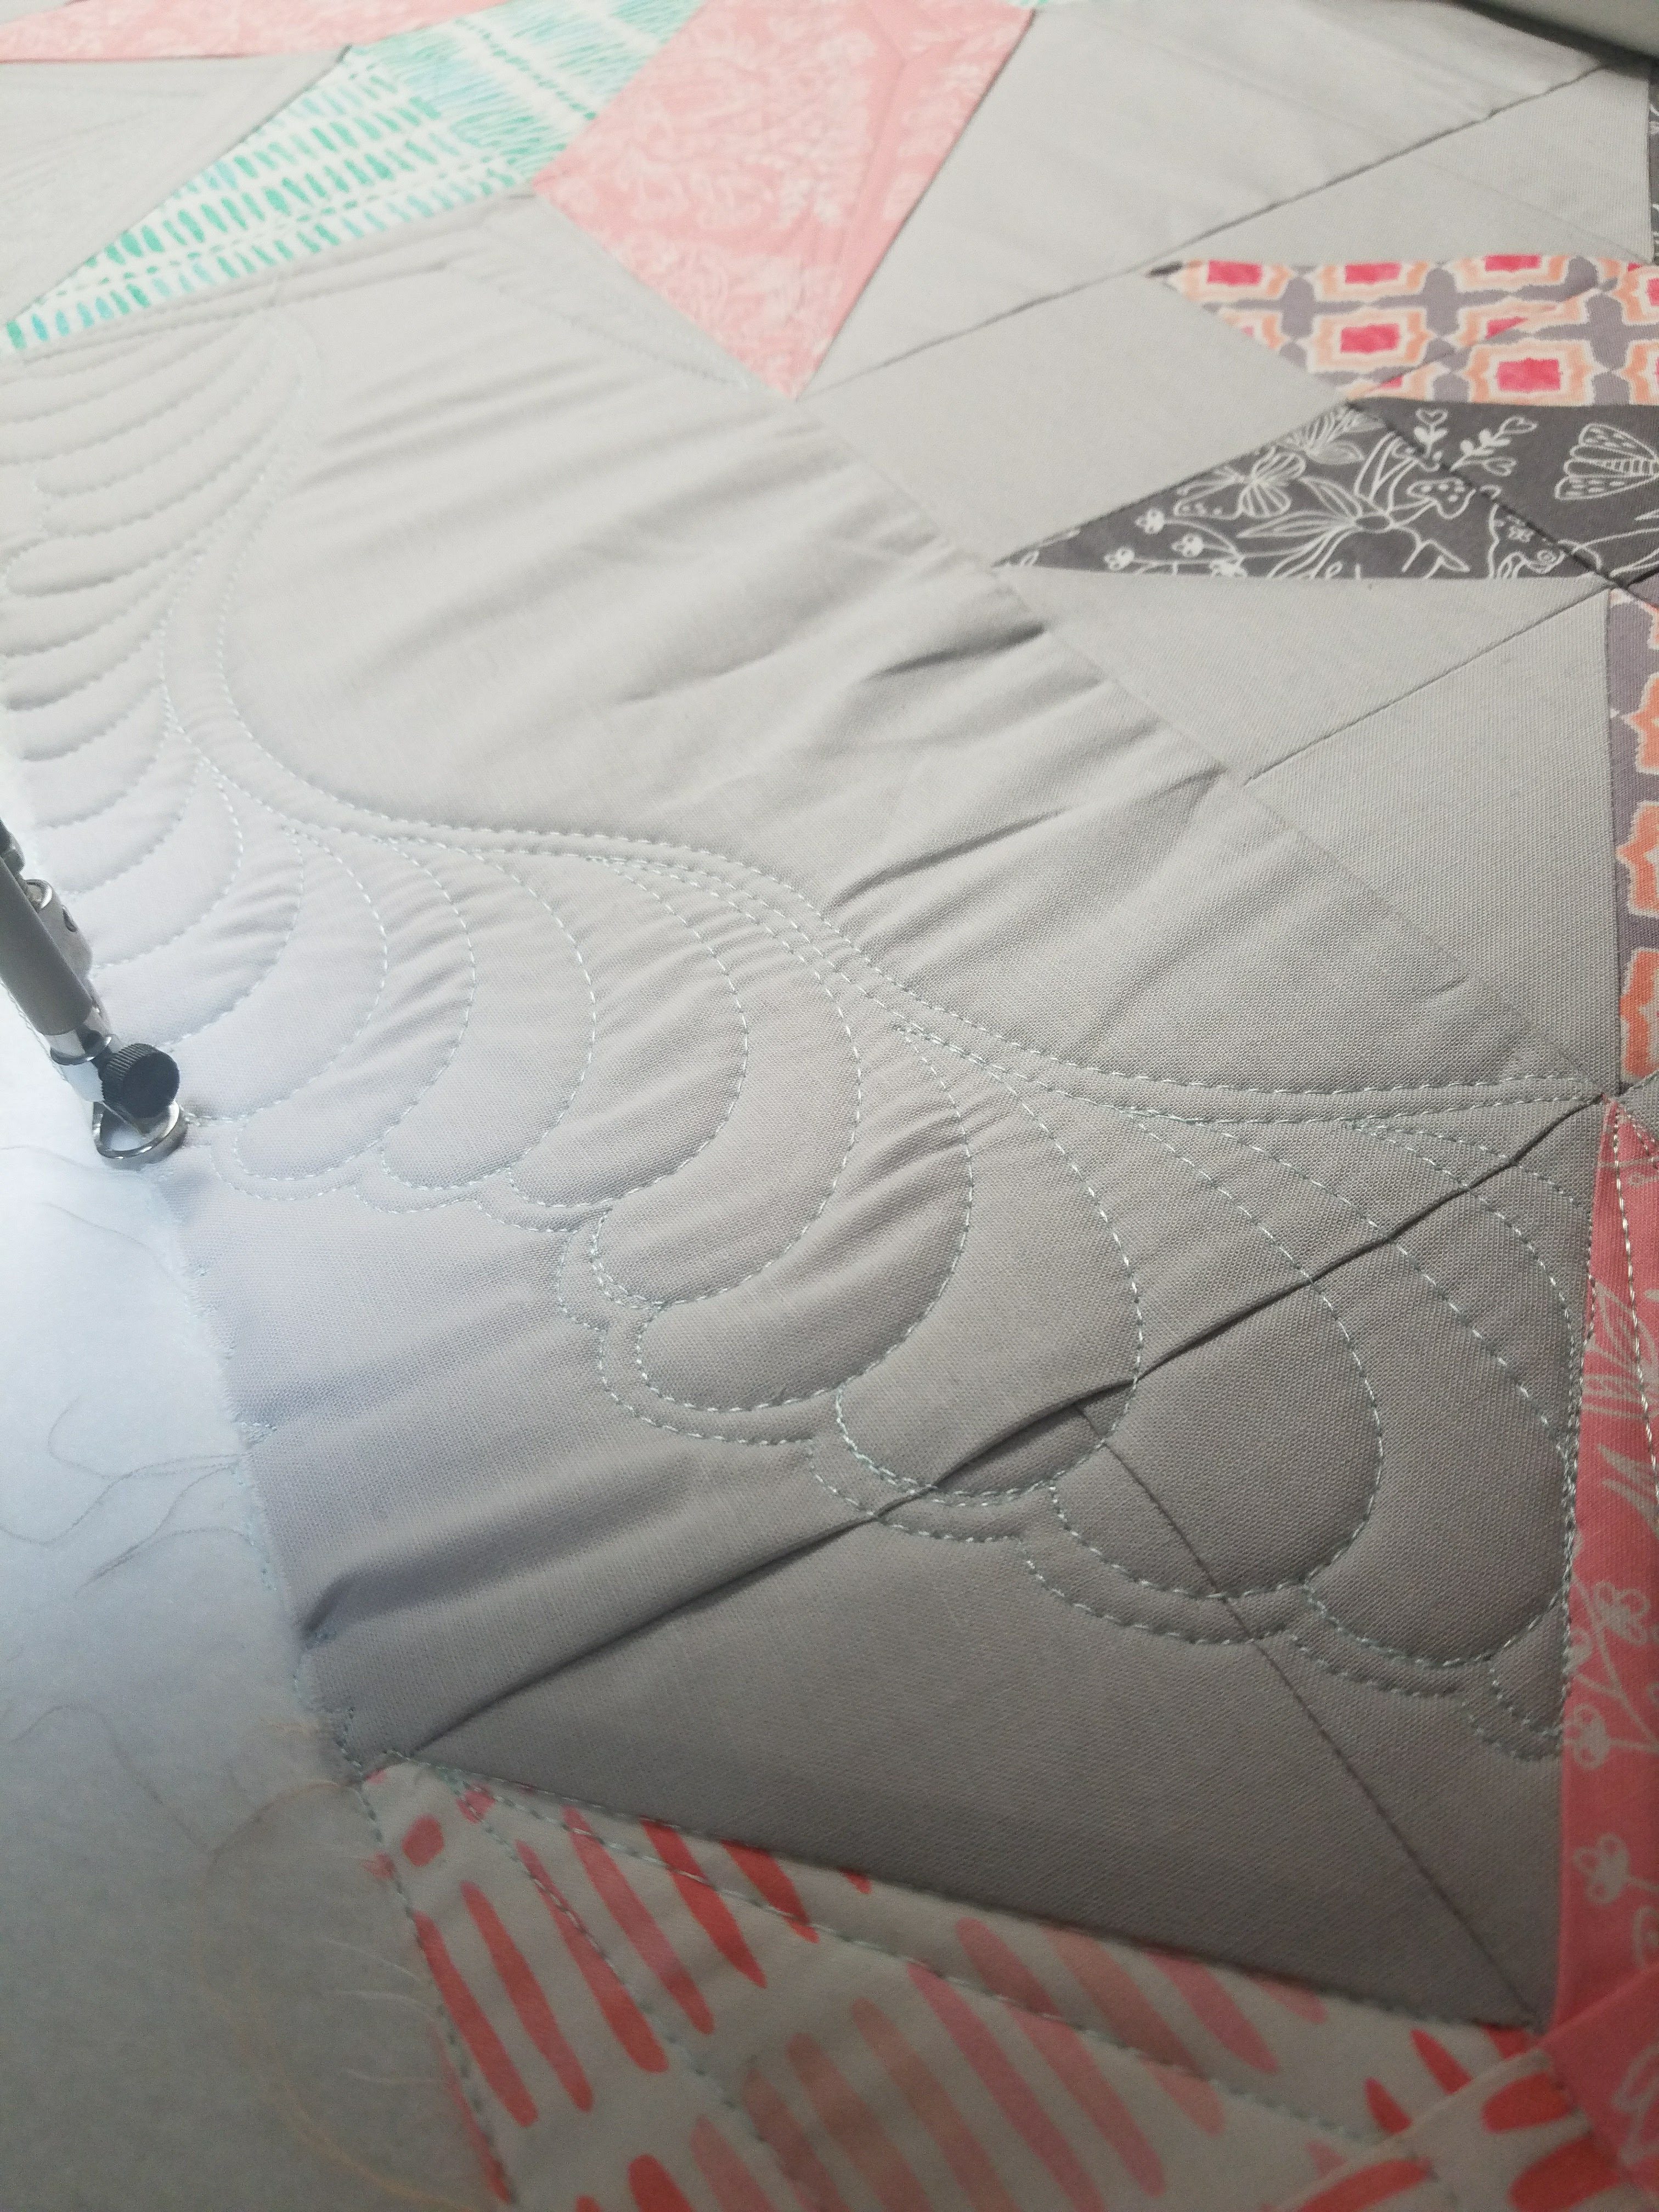
Once one side of the feather was done, I had to contend with the fabric left around it. The picture makes it look better than it actually was, there was quite a bit of extra fabric.
Using a dense filler helps take in some of the extra fabric, so that’s what I did around the feather. As I quilted, I tried to manipulate the fabric so that there would be as few tucks as possible.

I did end up getting a small tuck or two. But, I tried to get them as far from the feather as possible. Very few people look close enough at the filler to see any tucks and I am definitely not going to point it out. It’s not about whether or not you make a mistake, it’s how you make your mistakes as unnoticeable as possible.
4. Repeat on the other side.

I did the same on the other side of the feather, quilting the main part first and then filling around it. (I could have quilted the whole feather first and then filled around it, either way works fine)

And, voila, a quilt that’s flat and square, with just a few tucks hidden here and there.
5. Don’t point out the mistakes.
This is the most important part of the process, don’t show anyone where the mistakes are. They won’t see them, and there’s a chance that you will forget where they are too. Now, I know I just showed you my mistakes. But that’s different, it’s my job!
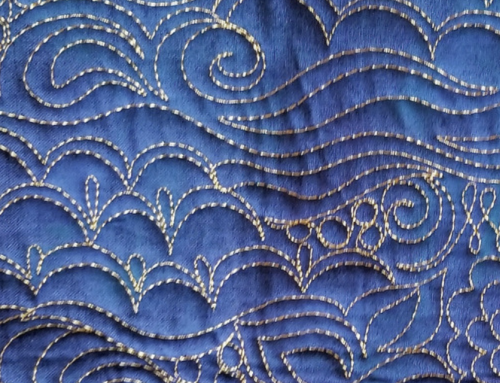
I would show you the whole finished quilt, but you are going to have to wait just a little bit. It’s for an upcoming secret project. I can’t wait until I can share it with you!!

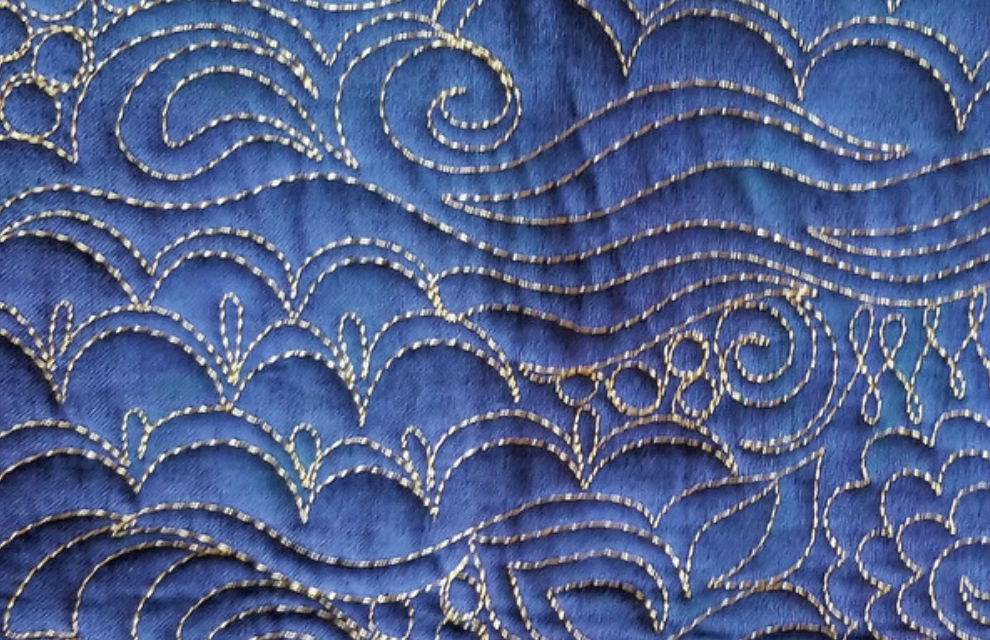
Here’s a sneak peek that I shared on my Instagram.
Your Turn
Do you have any particular tips for dealing with not-so-perfect quilt tops? If so, I’d love to hear them.
Happy Quilting!
By the time you finish quilting the main body of your quilt all borders are friendly! I bought two 6 by 12 inch rulers and glued them together. (Fronts together so the markings are always on the bottom). Now it is thick enough to use on my long arm. Sure markings are double, I just look at the ones on the bottom. But! Now I have all the increments in both directions I need to control those blocks. The ruler also helps to ease the fabric! I like the idea of the serpentine line along the edge I always used just a straight line and really did have to watch for tucks. Re-pinning is really important on the borders. Smooth out the fabric and replace pins for your new reality.
I have a quilt loaded now with really friendly borders… I mean real friendly. Would these suggestions work for that as well?
Definitely, but if they are really bad you may have to take a tuck by folding the fabric over. But remember, a finished quilt is better than a perfect quilt top!
I must say you have hi quality posts here. Your page can go viral.
You need initial boost only. How to get it? Search for: Etorofer’s
strategies
Using a serpentine line on the edge is a great idea! I’ve always struggled with friendly borders too, and a straight line only seemed to make the problem worse. Thanks for this post!
Thanks for this post. I’ve personally done better with my own borders when I started doing my own quilting (domestic machine). Took me a bit to get the hang of it, but between that, pins galore and spray basting most of my headaches of this type have went away.
Great suggestions about working in the fullness on the quilt top, but what about if you get a tuck on the backing? How do you handle that? You don’t find out about it until you are taking the quilt off the frame. Any suggestions?
If it’s for a customer, then I cuss and cry a little bit. After I calm down, I remove the quilting all around it and requilt it. If it’s my quilt, I don’t worry about it. Hope that helps!
Thank you so much for sharing your techniques with us, that’s very helpful. I love all of your Craftsy classes and your books. Also thanks to all the ladies sharing their “secrets”, really appreciated.
I love how real your quilts are, mistakes, issues and how to deal with them. I have been knitting my whole life, there has never been a project that doesn’t have mistakes. The same is true of my quilting, I am not a machine, glad that you aren’t either
Like I always say, there is no such thing as perfection in free-motion quilting. I am sure if I were a knitter, I would have plenty of mistakes in that too, lol. I like to joke that I am a people-pleaser, not a perfectionist. They are totally different neuroses.
I suck at piecing so this is why I love appliqué lol.Thank you for the tutorial
I hear yay!!! I especially love fusible appliqué 🙂
My tip is find a good seamtress and trade piecing for quilting!!! ? Realized early on that piecing isn’t my thing. (Thankfully I have a mom that is the perfectionist ?) I only want to piece when I hand quilt and who has time for that these days?!? ?
Thank you for the great tips…love learning from you and the other quilters that commented!! ?
That’s smart thinking there!!
I am also the worst piecer I quilt for!!! I do use the serpentine stitching to nail down my quilts on all sides as I quilt it. Like you, I’ll distribute the fullness across the bottom (why is it that the bottom is always where the problem surfaces??) and suck up as much as possible with mega-quilting (which I love!!). The lovely fluffy inner borders or medallions have been tamed with an extra layer (or two) of batting put under them while the quilt is on the frame. I had a customer quilt where she used a very loosely woven fabric for an 5″ inner border and a 17″ square in the center of the quilt…the border got an extra layer of batting and the center square got two extra pieces of batting – extra fabric contained with no tucks and she loved the look of the quilting in the “trapunto” parts!!
Smart! I will have to remember that one!
Angela, taking your classes on Craftsy gave me courage to begin FMQ and wavy borders is a problem I thought only I experienced. Thank you for posting this topic and these clear pictures. Also thanks to all who posted other options for this issue. I had tried spray basting the borders which did help. Is the serpentine stitch done on the long arm? Thanks
You can do it with any machine. The serpentine isn’t a particular stick, it’s just a method of moving the quilting on and off of the quilt.
My go-to fix for fullness at a border is using heavy fabric starch and the heat of an iron. I spray the starch on the offending waviness and a bit beyond as well. With the iron on the hottest allowable setting, I lightly and slowly glance it against the area that I have sprayed. Sometimes I repeat this to further reduce the fullness. This can be done with a teflon pressing sheet too, if the quilter is concerned about shine or flaking. The starch, which is technically a type of sizing, shrinks the fabric down, which is why starch should always be used before cutting fabric for piecing, rather than after cutting but before piecing. Thank you for your tip!
I have heard of that, but haven’t tried it yet. The next time I piece a quilt, I am sure that I will have a chance to try it out!
I would just make a new seam in the top to take in the extra fullness before quilting.
Thanks for the great tutorial, Angela! I find that I can get rid of much of the “extra” fabric simply by steaming the area. I hold my iron above, not touching, the area in question and give it several good shots of steam. Seems like much of the problem is often caused by stretching when ironing, rather than pressing, and the steam pulls the fabric back into its original shape. Of course, if one makes sure the blocks are square before joining them this won’t happen either, but not always the answer when it’s not our own quilt top. 😉
But if I pieced it correctly, I wouldn’t have much fun with “creative quilting” lol
Thank you for this tip – it’s superb! I mostly do free motion on my home sewing machine, but want a longarm so badly! I was lucky with the first two longarmed pieces I quilted by renting time at the local store.They behaved well.
The worst offenders for me are the quilts I decide to finish fast with a ‘birthed’ backing instead of a binding. Turning the whole quilt back to the outside through an open border seam introduces fullness into piecing (and often wholecloth!!) that was well behaved at the outset. My solution is to quilt those puffy areas densely first, and much of the trouble goes away as the quilting takes it up. Often the quilting chases the ripples to the border, and Tatyana’s tip of using piano keys works really well.
The serpentine tip is great. I usually baste one stitch at a time like Lisa (above) to ease in fullness. I also really like Tatyana’s (above) tip to quilt piano keys. Thanks so much!
Great tutorial and inspiration…it really CAN be done! Thanks for showing how!
THANKS ANGELA,
I LEARNED A NEW WORD “SERPERTINE” – GREAT ADVICE FOR THIS NEW BEGINNER IN THE QUILTING WORLD.
BEV
Great post and great suggestions. On one of my first quilts I ended up with too much to quilt out, so I stitched down the whole pleat in the outer border making a new “seam” 🙂
Thanks for all the helpful hints. I don’t do machine quilting (leave that to the professionals) but when my borders ‘wave’ at me I simply go back and taper (re-stitch) the seam to ease in the fullness. It doesn’t change the dimensions and I’m sure my LA quilter appreciates not having to make adjustments.
This post is, as they used to say, “News you can use!” Thanks so much for sharing some of your expertise with us.
That serpentine stitch around the edge tip is GOLD! I always seem to end up with puckers at all the corners from the fabric being pushed along as I stitch down the edges. I recently quilted a quilt of my own where all the outside edges were bias edges ?. It was a nightmare. Next time I’m going to try your serpentine stitch.
To help with a bias on the outer edge, do a quick basting/edge stitch on the sewing machine before putting your quilt on the frame.
You are my quilting hero! Thank you for these great tips!
Awww, you are too sweet!!! I am glad that you like them 🙂
Fabulous! And timely.
WOW!!! This post was SO helpful!! I particularly love the idea of using a serpentine basting edge!! That is genius! Thanks!!!!
One hint, one question. When basting the edges down (I will definitely try the serpentine idea) I will sometimes go one stitch at a time so I can ease in the extra fabric and also so my hopping foot can be jumped over any seams that it might drag over. This is also helpful on borders with a lot of seams, which I’ve discovered often are not stay-stitched and can pull apart.
My question regards handling wonky tops when doing edge-to-edge. My customers often do not want to pay the extra it costs to do custom quilting. I’ve felt like I’m between a rock and a hard place. Do I try to steer them toward a meander I can freehand from the front, or if they insist on choosing a pantograph, do I tell them there will likely be tucks in unpredictable places? This is made even harder because I often don’t realize there is a big problem until I’m putting it in the frame, which now makes it a phone call.
Working from the front of the machine gives you so much more control to help the fabric behave. I would work on building my variety of free motion designs so I could offer more options than just a meander. If you’re in the business of hand guiding pantographs, you definitely have the skill to branch out with your freehand quilting. If the customer still wants the pantograph with tucks, you can do that, but they may be more interested in something that will camouflage their piecing mistakes if you have an interesting variety of designs you can stitch from the front.
I think that if you explain to them that you are concerned about tucks, they will possibly agree with your judgement. Either way, being upfront beforehand saves a lot of stress.
wow! thank you so much! very helpful! (really like the fabric) 🙂 (also like the “friendly borders”)
Awesome, informative post! Thank you, Angela!
Good info, Angela! I just now finished basting down a quilt that I knew had top and bottom edges that were a bit wider than the middle. I used my DSM to put a line of basting stitches in the seam allowance on the top and bottom. Then I was able to pull the top thread of that stitching to help me evenly ease in the fullness before I basted the edges down to the batting/backing. This top is only about 33 inches wide — I don’t know how well this would work on a really large quilt, but I will probably try it. It worked great!
Perfect timing for this post! I just finished piecing and basting my own version of Jacqueline de Jonge’s “Catch Me If You Can” quilt pattern. It’s very intricate and even though the circle stars are all paper-pieced, when it’s time to insert them, it’s very difficult to make them lie flat, and the largest one is inserted last in the center, of course! My husband helped me baste it (I have a Bernina 820–large throat domestic machine), and we tried to tame the few bubbles. The first thing I did was to stitch in the ditch around that center circle, and I was able to tuck in a little extra fabric. I am hoping the filler quilting in the outside wedges of that circle will hide what little extra fabric is left but not be too noticeable. Your explanation helps give me some ideas. I am also looking through your books and online classes for quilt design ideas, because I made this quilt for my father (an 83-year-old jazz musician), and much of the fabric consists of busy prints (all red, white, black, and grays), so the quilting won’t really show except in the solid black background. I’m ditch quilting around everything, but not sure what else to do! Thanks for all your ideas and willingness to “be a human” quilter. It’s very encouraging for people like me.
Hi Angela, Thank you very much for sharing your helpful tip! Friendly borders are the most challenging to deal with.
My approach is to quilt them with piano keys where suits. 🙂 It is usually easy to tuck in extra fabric in between the ‘keys’.
Thank you!