Recently, I had the pleasure of teaching a “Help! How Do I Quilt it?” class at my shop. It’s fun seeing everyone’s beautiful quilt tops and giving suggestions for quilting designs. Since I don’t have to actually do any of the machine quilting, I can suggest anything……how about micro-stippling around trapunto feathers? Just kidding, there were no crazy complex or difficult suggestions. In fact, one thing that I said over and over was that quilting doesn’t have to be difficult to be effective.
To illustrate my point, I took the class on a field trip to the front of the quilt shop and pointed out the quilt that I feel illustrates that point so very well.

Tumbler Quilt Designed by Tula Pink
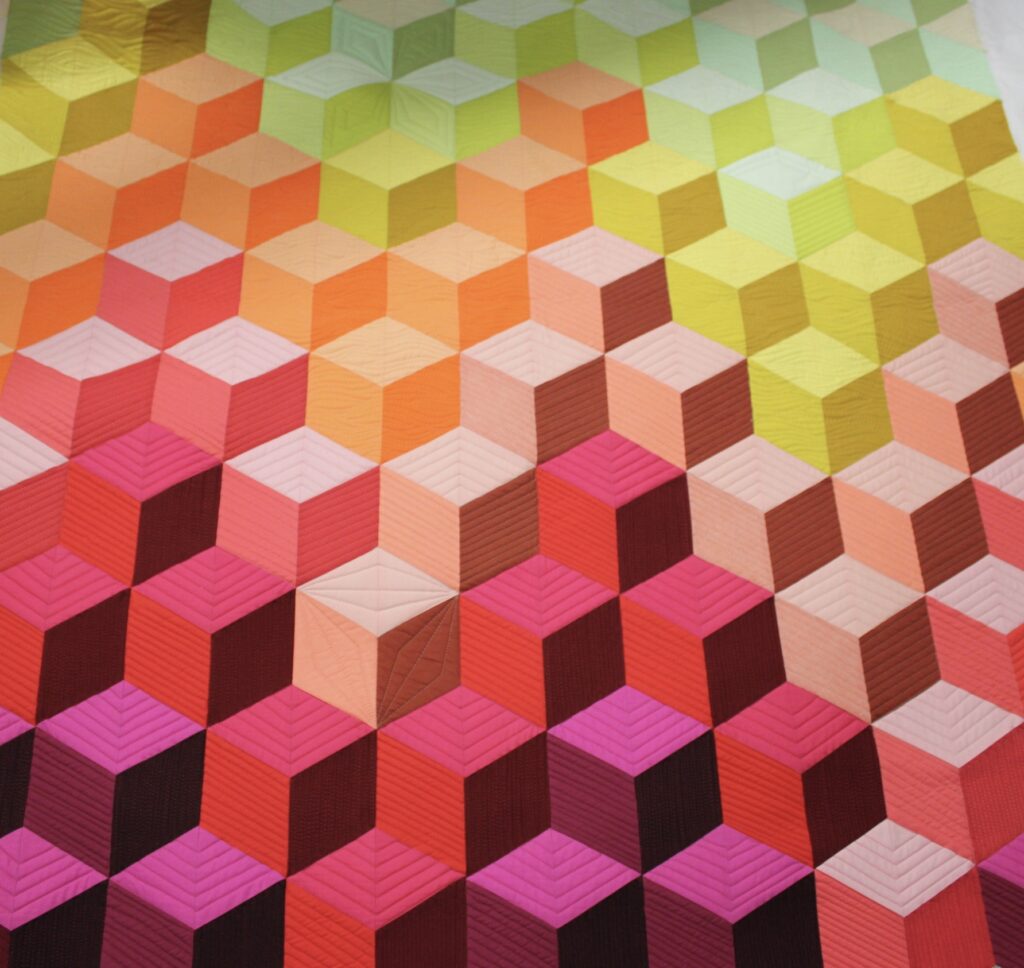
The Tumbler quilt is one of the 17 quilts featured in the book I wrote with Tula Pink, “Quilt with Tula & Angela”. It showcases the one thing that most of us already know, Tula Pink is genius with colors. The colors in this vibrant quilt give it a 3D illusion. My only job as the machine quilter was to not mess it up! I am sure some of you feel like that sometimes, so here are three steps for interesting quilting (without making it difficult!):
-
Use contrast to highlight portions of the blocks.
Contrast just means using different quilting designs next to each other. They could have different densities, different directions or different shapes.
For instance, let’s look at the quiting in the “red” blocks. Since they are darker, I used designs with different densities and different directions to highlight the 3D illusion.
(When I talk about the density of quilting, I am only talking about the space between the lines of quilting. The closer the lines are, the more dense the quilting design is, and visa versa. It doesn’t matter what type of quilting design you use, it can be quilted more or less densely.)
In the darkest portion of the block, the lines are at most 1/4” apart. I quilted the lines just under 1/2” apart in the medium color and about 1/2” apart in the lightest color.
The contrast helps illusion of depth. The lines don’t just have different densities, they have contrast in directions; horizontal, vertical and diagonally
2. When you are bored with Step #1, start quiting an allover design.
If I could give you just one quilting motto, it would be, “You don’t have to do hard stuff on the whole quilt.” Sometimes quilters (myself included) can get into the mindset that the quilting on the whole quilt needs to complex and time-consuming. No wonder machine quilting gets such a bad rap! Instead of getting bored, try switching to a different, quicker allover quilting design.
In the orange and green blocks I quilted the Wavy, Wavy allover design from Shape By Shape Quilting. It was so much quicker to quilt and a nice break from the ruler work. (When quilting on a longarm I use rulers to quilt diagonal lines. The lines look great but it slows me down.)
If I don’t want to admit that I was being lazy, I just give an artistic reason. Something like, “I just love the juxtaposition of the wavy lines with the angular lines in the red blocks. It speaks to me on a cellular level.” (Hint: If I use the word “juxtapose” I am completely joking. It’s my “sound like I went to art school” word.)
It doesn’t matter which allover design you use. Pick one you want to practice or one that you are super comfortable with…especially if you are listening to a good part in an audiobook and you don’t want miss any details. (How interested I am in an audiobook has been known to affect the designs I decide to use in a quilt. Just saying!)
3. To keep from getting bored in Step #2, quilt random blocks differently.
This is the secret to fun quilting! If you get bored while quilting, it means that you might not be using enough quilting designs. Try quilting random blocks differently from the rest of the quilt. It let’s you practice new techniques without committing to doing it over a whole quilt.
In the Tumbler quilt, I combined some of the blocks to make a star-shaped block. Creating secondary designs with quilting designs is one of my favorite ways to amuse myself while quilting.
Try playing around with variations of designs you have already used. This Dot to Dot design requires no marking and just uses the corners of the tumbler as reference points. It’s one of my favorite ways to quilt blocks. (I’m starting to notice that every design is my “favorite” one to use……hmmm)
In other blocks, I would quilt them as if they were red blocks. Why? I don’t know, it just sounded fun.
Let me point out that I can get away with using so many different designs because I use thread colors that match the quilt. Doing so allows the texture of quilting to show without overwhelming the quilt top. But remember, thread color, as with everything else in quilting, is completely a personal preference!
Did I use groundbreaking and completely original quilting designs? Definitely not. Was it still effective? I like to think so. I love how it used simple shapes to create interesting textures and I didn’t get bored in the process. To me, that is the definition of effective quilting.
Here’s the thing, no matter what quilting designs you pick or which thread color you prefer, the most important thing is that you finish the quilt. A finished quilt is always better than a perfect quilt top. So the next time you are stumped on how to quilt your quilts, just get started!
Awesome tutorial and blog post…wish I could see this beauty up close and in person but the pictures are great. My goal is to get comfortable gliding from one design to another without stopping and fretting over what to do next…not sure I would have dared to put a star in the middle of the wavy, being afraid I would not like the look or regret it after. You have a special talent to change designs quickly and decide on the fly with no looking back or stopping. I hope to get there some day…with your videos and books I think I can 😀 Thanks for the help and inspiration!
Angela, I have been using your books and applying different patterns to my quilts for the last few years. Recently, adding them to the many baby quilts is produce.
I am a “home machine” quilter, Janome 6600. I now have a queen sized quilt layered and ready to quilt. It is a log cabin in the barn raising pattern, Civil War fabric, quite traditional. Do you have any articles about quilting such a traditional pattern?
Wynne
I started quilting 2 months ago & just finished my 1st quilt. Actually, hadn’t even sewn until 4 months ago when I purchased my 1st sewing machine and stumbled upon quilting. So, I have many, many questions, but priority for now is Threads. Similar questions have been asked, but could you address threads in a video? You say you change often. On a regular machine, that sounds timely. And, if you do change colors, is your back full of colors? I used one color only on my 1st quilt, which worked well for light and medium color, but does not look good on my dark contrast color. Question 2: Do you have a summer class schedule made yet? I live 2 hours away. I teach middle school. After May 18, my goal is to visit Liberty and take your classes.
I do change often because I don’t want the quilting to overwhelm the quilt. It is time-consuming, but using a 50 wt thread means that a thread can work over a range of colors. I also make the color of the bobbin match the top thread. I don’t have a summer class schedule yet, but it will be up soon!
My question is how do you handle changing the thread colors so often? Do you bury your threads all over the place????
Angelia,
I would love to know how you keep the supreme slide in one place. I have sewn mine to the quilt two times. Very frustrating.
Angela, you are an inspiration! I have been saving tops for quite awhile waiting until I got good enough to quilt them. My quilting did not improve by letting them sit. I have been practicing and playing with them. It is freeing to just enjoy the process. I am not great by any means, but I am improving. I had hoped to see you at QuiltCon, but enjoyed seeing your beautiful quilts in person.
I love your quilting advice! The 3 steps in this blog are great ideas I hope will stick in my head
Lots of inspiring ideas here, thanx! Can’t wait to give these a try.
I have a question about thread color. Did you change the color so it was the same color as each block? How many colors did you use for this quilt?
yea I want to know this too! especially for the allover design, how do you switch thread colours without interrupting your flow?
You are my go to quilting guru. I love your Midnight videos and your common sense quilting ideas. This article will help me on some quilts that still need backing and machine quilting. Thank you Angela!
How big were the blocks in the Tumbler quilt? I have a king size quilt with 60 degree diamonds cut from 2in finished strip sets. Don’t know how to quilt it. This really helped. Thanks for the post.
Great article! Thank you.
Question: When will The Midnight Quilt Show be back? I’m having withdrawal symptoms!
Thank you for sharing these techniques. I think when I was quilting my own quilt, I always think too much and at the end, I still pick a simple design to put on blocks. I often have lots of questions about how to quilt those Block-of-Month quilt, they are usually have 12 blocks with different fabric and contain various colors. It’s hard to pick out what color of the thread to use on the entire quilt because I don’t like to change thread colors, too much trouble. I think I will re-visit your Craftsy class – How do I quilt it?
Thanks again.
What awesome quilting. Did you have a lot of starts and stops because of using different colors of thread? I love your blog and quilting.
Great blog thanks. I have been struggling with thread colour. Good to know you match the thread, I started a quilt that has different bright solids with a neutral grey and hate it, Going to match them 🙂
Wonderful article! The quilt is beautiful and fun to know it is not quilted the same all over.
Thank you for the great ideas. I’m putting together a quilt that I am just loving with an improv pattern. It fits the bill for giving me some ‘make these blocks’ and then improv the rest practice and your post has inspired me to come up with more than ‘1 1/2 squares all over it’ quilting. Plus I was happy to share it our our modern guild’s FB page.
Sure wish I could have success free motion quilting on my home machine. Lost count how many times I’ve tried and many projects I’ve ruined. There is no help out there for learning to even out stitches and finding success. If someone knows how, please tell me.
Hi Laurie, I’ve only been FMQ since July but I’ve come a long way since then. The things that have helped me is free motion quilting videos on Craftsy, Annie’s and even You Tube. I also found that drawing the design many times over before actually quilting saved me from ruining the actual quilt. I started with regular ruled paper from a notebook but now I like using quad paper, the kind that has 1/4 inch or 1/8 inch squares throughout the page. I also made lots of practice pads from cotton fabric remnants or sale fabric that I purchased at my local fabric store. Always make a practice pad from the same quilt fabric and batting you plan to use in your “real” quilt and practice the FMQ you plan to use on the pad first.
Thanks for a great inspiring post Angela and giving ‘permisson to play’.
Thanks for such a great article. I always get stuck on thinking if I quilt a certain shape one way, I need to quilt it that way all over the quilt. It’s so refreshing to see you both switch it up a lot, and use both custom and allover designs … on the same quilt! It’s nice to see rules being broken.
Thank you for a clear and inspiring post. I got what you meant and I think it will help me not to sweat out every detail on my quilts.