
Paisley Feather Machine Quilting Tutorial

Who doesn’t love a beautiful feather? That’s rhetorical question, of course everyone loves feathers. Ok, maybe not everyone, but it seems that a lot of quilters love the look of them. But when it comes to quilting them….it can be a little tricky.
That’s why I have put together a new video tutorial featuring how to quilt my favorite feather, the Paisley Feather. I want everyone to love quilting feathers as much as I do!
About the Paisley Feather
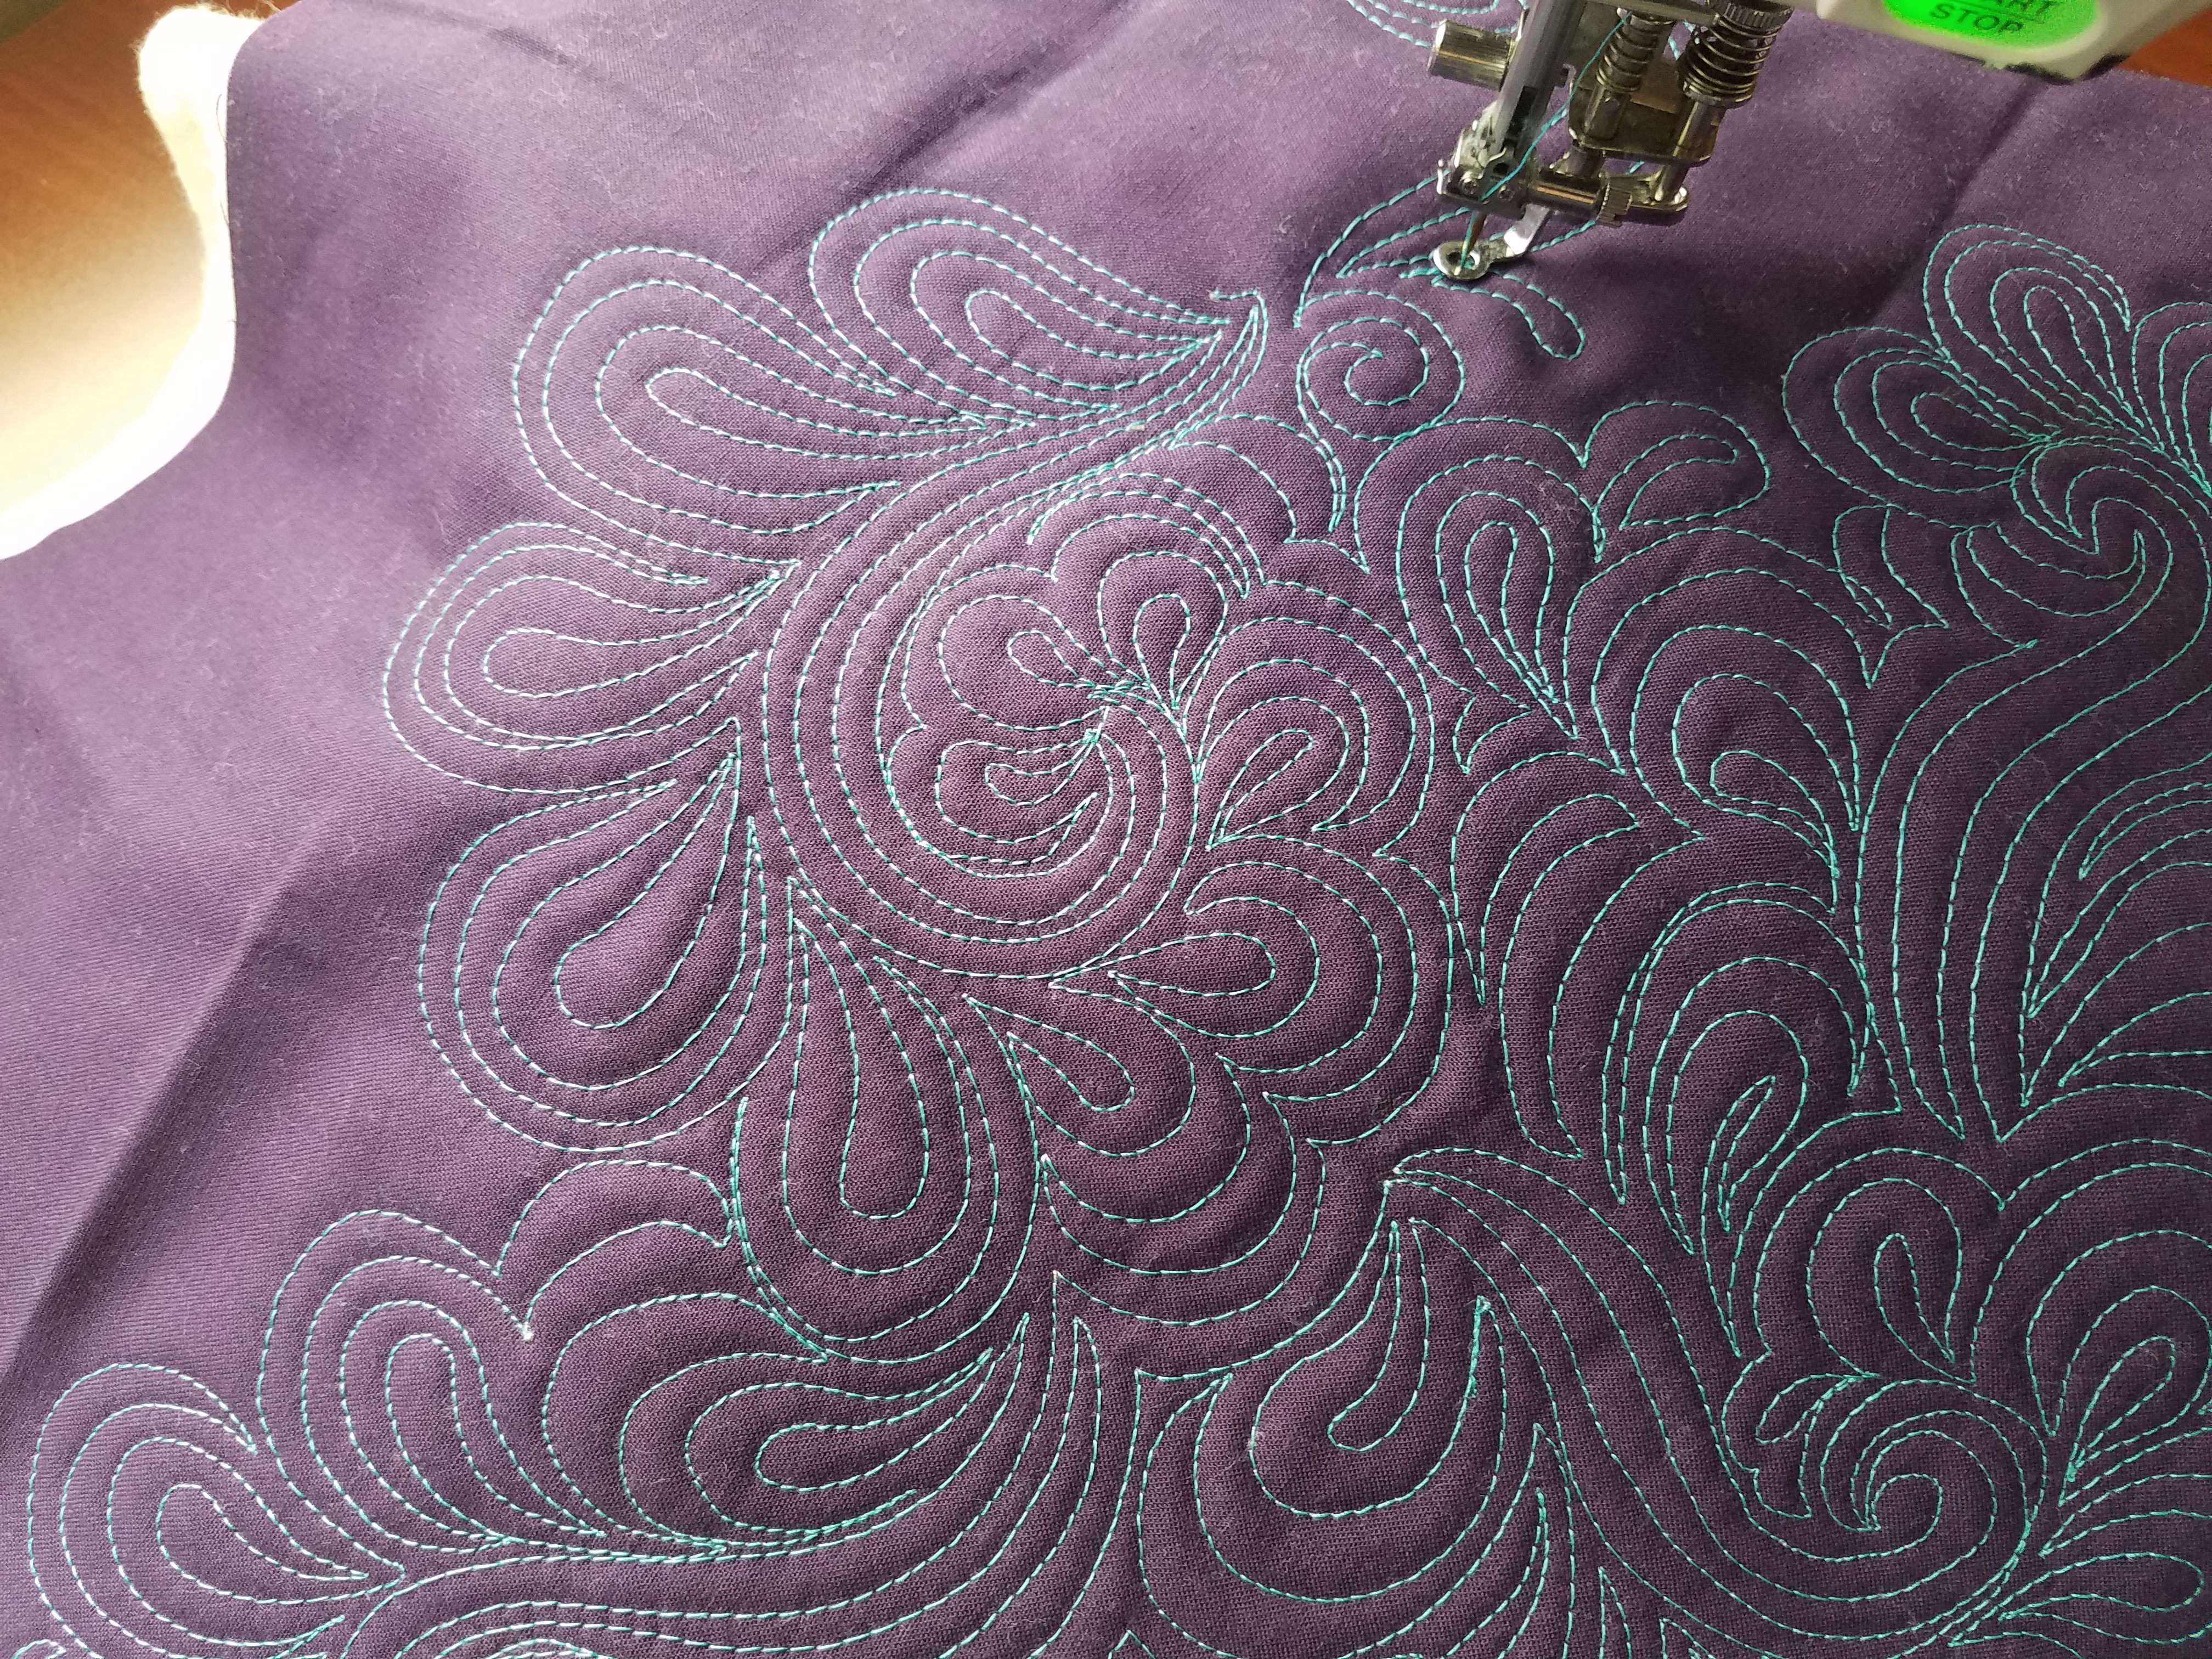
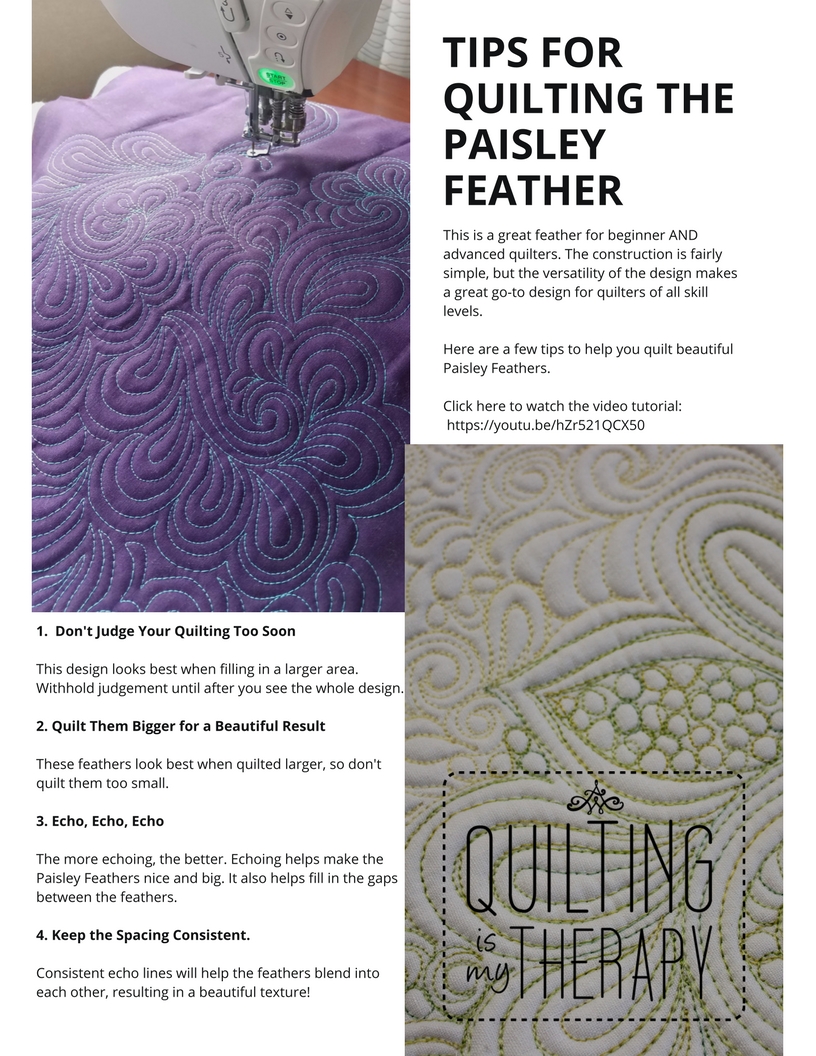
This is a great feather for beginner AND advanced quilters. The construction is fairly simple, but the versatility of the design makes a great go-to design for quilters of all skill levels.

It can be quilted as an allover design or used to fill in around blocks of a quilt. Once you learn how to quilt it, I think you will be excited to use it on one of your quilts!
Tips for Success
Before I share the link, I want to give you a few tips to help you get the best Paisley Feather possible!
Don’t Judge Your Quilting Too Soon
It can be tempting to quilt a small portion of the feather, then stop to judge how it looks. But that only will only give you part of the picture. It’s best to fill in a whole section before you decide how you feel about it.
When a whole area is quilted, all you will be able to see is the overall texture. The individual feathers won’t stand out, which means that any mistakes won’t stand out either. So before you start quilting, commit to filling in a whole area (such as fat quarter) without giving up.
Doing this will help you see how even glaring mistakes can tend to disappear once surrounded by more feathers. This really is one of the magical things about quilting.
Quilt Them Big and Beautiful
I mention this in the video tutorial, but I want to reiterate it in this post. Your paisley feathers will look so much better if you echo around the paisleys and really make them nice and big.

I know when learning a new design, it can be tempting to quilt them so that they are small. But trust me, it looks much, much better when the feathers are nice and big Plus, it’s a lot quicker to quilt. That’s a win/win in my opinion.
Echo, Echo, Echo
In my opinion, the hardest part about quilting paisley feathers is dealing with the gaps that can form in between the feathers. But that doesn’t mean you need to stress about it. Most people will notice a gap in the quilting before they notice an error. That means that as long as you fill in any gaps it’s going to look great!
With this design, I like to use echoing to fill the gaps. It doesn’t matter what you echo, or even if you quilt something different altogether in those spaces. Just fill them in and move on to a different area of the quilt!
Keep it Consistent
If you have ever taken a class from me, you have heard me say this a bunch of times….”As long as the spacing is consistent, all you will see is the texture”
Keeping the echo lines somewhat consistent will make all the paisley feathers blend into each other. This is especially helpful while learning a new design because it means that any mistakes won’t stand out.
Using the quilting foot as a guide is one way to keep the lines evenly spaced out. That means while quilting, I am running the foot along the previously quilted line…..or at least attempting to do that. Remember, it doesn’t have to be perfect.
Paisley Feather Variations
Once you learn how to quilt the Paisley Feather, there are so many different variations that you can come up with. Here are just a few:
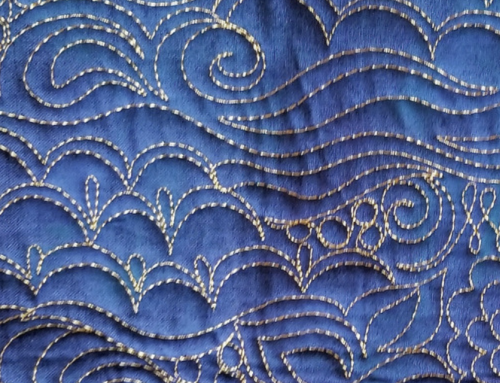
Paisley Feathers and Pebbles
Instead of echoing in the spaces between the paisley feathers, you can quilt a different design, such as pebbles.

This allows the individual Paisley Feathers to stand out more, instead of blending in to each other. It takes a little longer to quilt, but the result is so worth it!
Paisley Feather Motifs
When quilting the Paisley Feather, I tend to quilt paisleys on just one side of the feather. However, if you want the Paisley Feather to look more like a “traditional” feather, you can add paisleys on both sides of the swirl.

Swap Out the Paisleys
If paisleys aren’t your thing, you can play around with different variations. Throwing in a leaf every now and then adds a bit of interest to your quilting.

As an additional benefit, it makes the quiting look super difficult, but now you know how easy it is! I won’t tell anyone if you won’t!
Free Downloadable Tip Sheet
I’ve put together a free downloadable Pdf of the tips in this post. Feel free to print it out and keep it close while working on your Paisley Feathers. Enjoy!
Your Turn:
Are you excited to learn how to quilt the Paisley Feather? Without further ado, here is the video tutorial:
I hope you will leave a comment on the video letting me know what you think or if you have any questions. Not only does it allow me to connect with you, it also make YouTube more likely to promote it to other viewers!
Thanks so much and Happy Quilting!!
Wonderful! What sewing machine / quilting foot are you using for this design?
Angela,
You are a wonderful teacher. And so encouraging! My sister told me about your web site, and soI joined your quilt challenge..Evan though I began hand quilting in my teens, carpal tunnel and other hand problems no longer allow me to continue. Your videos have opened up a new world of quilting for me. The first challenge I learned so much, your encouragement kept me pushing ahead to a product that now pleases me!
Thank you!
This tutorial was absolutely great. Thanks so much Sue Watt
Hi, where can I download the feather PDF
Angela, you are simply the best. Love your style of teaching, you are bubbly and fun. You help relax us. Thank you so much for all your hard work and sharing it. I love paisley design and I am going to try this tomorrow. Hopefully some day mine will look as beautiful as yours. Lots of hugs to you my dear….Claudia
Thank you so much for taking the time to leave such a sweet compliment! You have made my day, happy quilting!
I love this tutorial for the paisley feather! So many possibilities! Itried it first to make a bunch of potholders and it was so much easier than I thought it would be! So today I,m going to try it on a border! I always learn so much from you! Thankful for sharing!
Yay!! I am so glad that you love it as much as I do!!!
I love this tutorial for the paisley feather! So many possibilities! Itried it first to make a bunch of potholders and it was so much easier than I thought it would be! So today I,m going to try it on a border! I always learn so much from you! Thanks for sharing!
Great tutorial, going to try it soon.
Hi Angela, I loved your Paisley Feather Video/Tutorial and the way that inspire everyone to give it a try. I have seen your name on Craftsy.com a great deal and some other places, but am so happy that I found your blog and YouTube Channel. You now have a new follower for sure!
Beautiful design. I will definitely try it. Thanks. Brenda
Thanks for the video. I am working up my nerve to try this soon!
I think I can, I think I can, I think I can, thanks to you! Nina
LOVE this!!! I have just the quilt to try this on 🙂 You make it look so easy but you also give me the confidence to do it!!! Thanks
You can definitely do it! Give it a go and let me know if you have any questions!
Love
This is something I really want to try. Do you have any tips for using this on a full size quilt?
Just do the smoosh and push, lol. No really, take your time and just focus on the area in your sewing machine.
You make this look so easy! Just beautiful!!
Love this! You make it look so easy!
You are the best!! Thanks for sharing your passion…it does rub off and makes me think I can do anything (almost, lol)
Love your style and your attitude 🙂
You definitely can do it!!! It just takes a little practice!
Wonderful tutorial! I love watching your Late Night Quilter videos!!!!
How fun! Thank you for the lesson.
Love the video, thanks for sharing. No question right know but off to see what I can do with this designs. Thanks love your work!
I REALLY LOVE THIS — QUILT A FEATHER, ECHO, echo, echo, little bitty squiggle, echo, echo, echo. I have to watch it again to get all the words right, don’t I. but as long as I get the MOVES right, I’LL BE OK! echo, echo, echo
You make it look easy. Thanks for the encouragement, now to practice, practice, practice…
You make it look so easy. I need to try this!
Awesome tutorial!!! Thank you so much….can’t wait to try this!!
Beautiful! Very helpful tips on how to get out of dead ends. Thanks!
Yay! I am so glad that you found it helpful!!
A great reminder to step away from “preprogramed” e2e desings,
“Echoing” a previous comment–thanks for sharing YOUR gift. Love your talent and the inspiration you give to us.
I am so glad that you like it. I just want people to love quilting as much as I do!
Angela: You are one of my FAVES, I love to relax and watch your U Tubes – If I’m not quilting, I’m watching U Tubes, beats TV every time. Keep on motivating us – I have mastered the paisley design and pleased that I can do that with confidence even when I have trouble with other designs. Bless U & Yours.
Yay! I am so glad that you find it helpful. Thanks so much for your support!!
Every video is a great teaching moment. Thank you for your gift.
Thank YOU for your support! I can’t tell you how much I appreciate it!
Thank you!
I love watching you quilt. I have good success with paisley feathers but my swirls not so much. When I get to the center of the swirl I have trouble making it round. I get a little straight part and I don’t know why. I have doodled and practiced alot. Any suggestions?? Can’t wait for your next video. Maryanne
Just off the top of my head, I would say go a little faster. But it’s hard to know without looking. Can you email me a picture? My email is [email protected]
I love this. Thank you so much for this design. It looks like so much fun.
Thank you for the video. I was encouraged to try the paisley feather and will do it tomorrow. You make it look so easy and maybe it will be with practice.
You make it look so easy! I am quilting something purple right now, just like in the video, so I feel like I should give your lovely paisleys a try. Thanks for the idea.
Yay!! Go for it! It’s so much fun!
Thank you so much. As I watched the video I thought to myself, I can try that. I am excited to try that tomorrow. You make it look so easy and maybe it will be with lots of practice.
Wonderful video, I be trying your design!!
Loved the tutorial! You are such a great teacher and give others the courage to try new designs and expand their quilting knowledge base. Thank you!! I so appreciate the videos!
Angela, you’re the best. Love watching you work. You make it look so simple. Thanks.
thank you, it gives me courage to try!
I love your videos. You have inspired me so much!! You explain everything so well. I can’t wait to try these all out. Thank you for your excitement, I feel excited to quilt now!!!
My first time to watch. Am usin a Brother Quilting machine. What machine are you endorsing or attachment?
I am using a Handi Quilter Stitch 710. I love it!! Here’s more info about it! https://quilting-is-my-therapy.myshopify.com/collections/hq-stitch-sewing-machines/products/hq-stitch-710-sewing-machine
I love your videos. I machine quilt on my domestic machine and have learned a lot from watching you. Thank you !!!!
thanks for another fun informative you-make-easy video.
And thx also for the Midnight quilt show, that recent one with CURVES…..yes.
jo
THANK YOU FOR THESE QUILTING TUTORIALS-i USED TO DREAD THE QUILTING PART BUT NOT ANYMORE! YOU HAVE INSPIRED ME AND SHOWED ME THAT QUIILTING DOESN’T HAVE TO BE COMPLICATED TO COME OUT BEAUTIFULLY
That is exactly the result I am going for!! I am so glad that it’s helping you!
What a great tutorial. I feel that even I can do this!
This was a great tutorial. I recently purchased an HQ Sweet Sixteen and am looking forward to using your tips. I think I have watched every one of your You tube videos and you inspire me. Keep them coming – you are my absolute favorite!!
Wonderful tutorial. Can’t wait to practice a bit then take it to the longarm.
Great design. I love the paisley feather, it’s very modern, I wouldn’t attempt a traditional feather, not really my thing. This is a definite for my next practice session.
Love your work Angela, i will be tring this out today on a cheity quilt! Thanks Angi
Thank you for your guidance. I have quilted numerous ‘throw away’ tops that ladies are now using on their own beds! That is the greatest compliment.
This is the best example of how to get out of a “dead end” that I have ever seen. When I see I have boxed myself in I usually panic and end up quilting something ugly to get out or breaking thread. What a great solution…..echoing! Thanks for a great video!
You make it look so easy! Thanks for all you do to help us love quilting!
Love that design and all the tips. Keep up the good work!
I love the design and your demonstration/explanation was great. Left me thinking, “I can do this!” Thank you
This is such a well done video, chalked full of information and demonstration. It is great to see and hear that perfection of stitches isn’t necessary for a great looking finish. I also like how you quilt as you give all your great tips. Thanks for sharing.
You are such a giving person. I so appreciate your video tutorials. I am off to try it and practice, practice, practice…..
Fabulous video. You make it look so easy. Thanks for sharing your talent. I will be trying this out!
A great tutorial…..I love how you make these so doable…can’t wait to try this. Thank you!
I’m always mesmerized by quilting videos. Your sweet voice made it even more enjoyable. You are a talented lady. Congratulations!
Wonderful, can’t wait to try this idea! I like to make changing pads for my friends becoming grandmas, that is where I practice new quilting skills. I have watched or listened to several while I actually quilt. It helps a lot, hearing your directions as I am working. Thanks so very much!
Always a treat to see something new from you! Thanks so much!
Thanks! Great ideas. I love your work.
Thank you Angela! I always learn something new when I watch your videos!
Thanks for another great tutorial
Hi Angela, – fabulous tutorial. Thankyou for sharing. You make it look so easy ! I have 3 of your Craftsy classes, and love your blog. and have made serious inroads in my own quilting skills thanks to you. I would never have achieved so much without your wonderful teachings. Thank you !! Sheila.UK.
I watched the video yesterday and thought it was another excellent share from you! I quilt on a Janome Horizon and can’t wait until the machine is free so I can practice this and all the variations! I do all my practice work in the negative space of a quilt just for me and it’s going to be a spectacular journal of my progress! ~karen
Hi Angela, tks so much for these videos. I just love them. I have all of ur Craftsy vids & all ur books, u r my “go to” when I’m stuck on something. Having said that tho I’d like to see something “new”. Ur Midnight Quilt show is wonderful as well & I look forward to seeing some new “stuff” on there too. I don’t know how u manage it all but I love that u do….thanks so much…..an adoring fan…..
Thanks for another wonderful tutorial! I love your laid-back style and how it translates into beautiful work!
Angela , you have inspired me so much! Love how you talk about mistakes, to keep going and they disappear. I’m very judgmental with my quilting and with your tutorials I’m letting that go and quilt. So much fun! Thank you. Sharon
Thanks Angela…You do beautiful work, and you make me believe that I can do feathers also!
Meant to say “feathers and paisleys” also
Great tutorial! Thanks Angela
Thank you for sharing! Years ago I first saw your quilting at a Quilt shop in Missouri on Tula Pinks quilt….that day I fell in love with quilting! You are so king to share your talent!