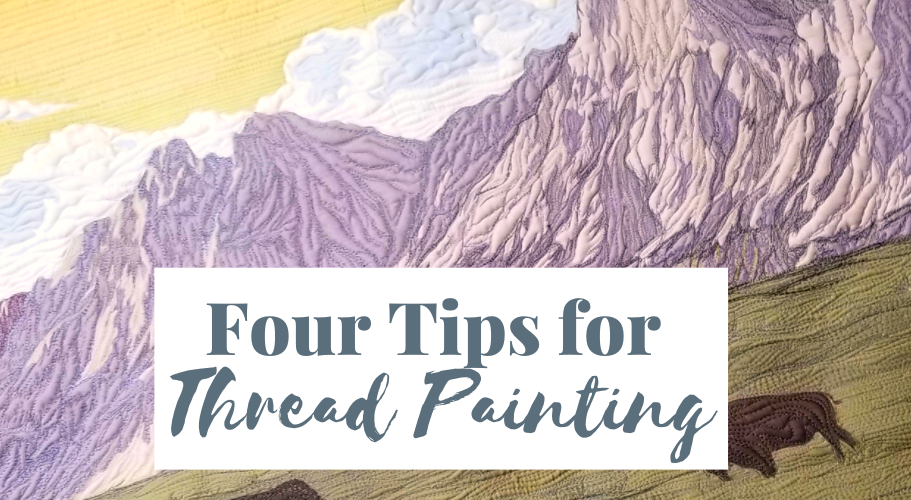
A couple of weeks ago, I did a live quilting demo on my YouTube channel featuring one of the National Parks panels and some of my favorite threads. I was showing off a fun machine quilting technique, thread painting.

If you’ve been thinking about giving this a try, you should! It’s not as daunting as you might think. Below are 4 tips that just might make it a little easier!
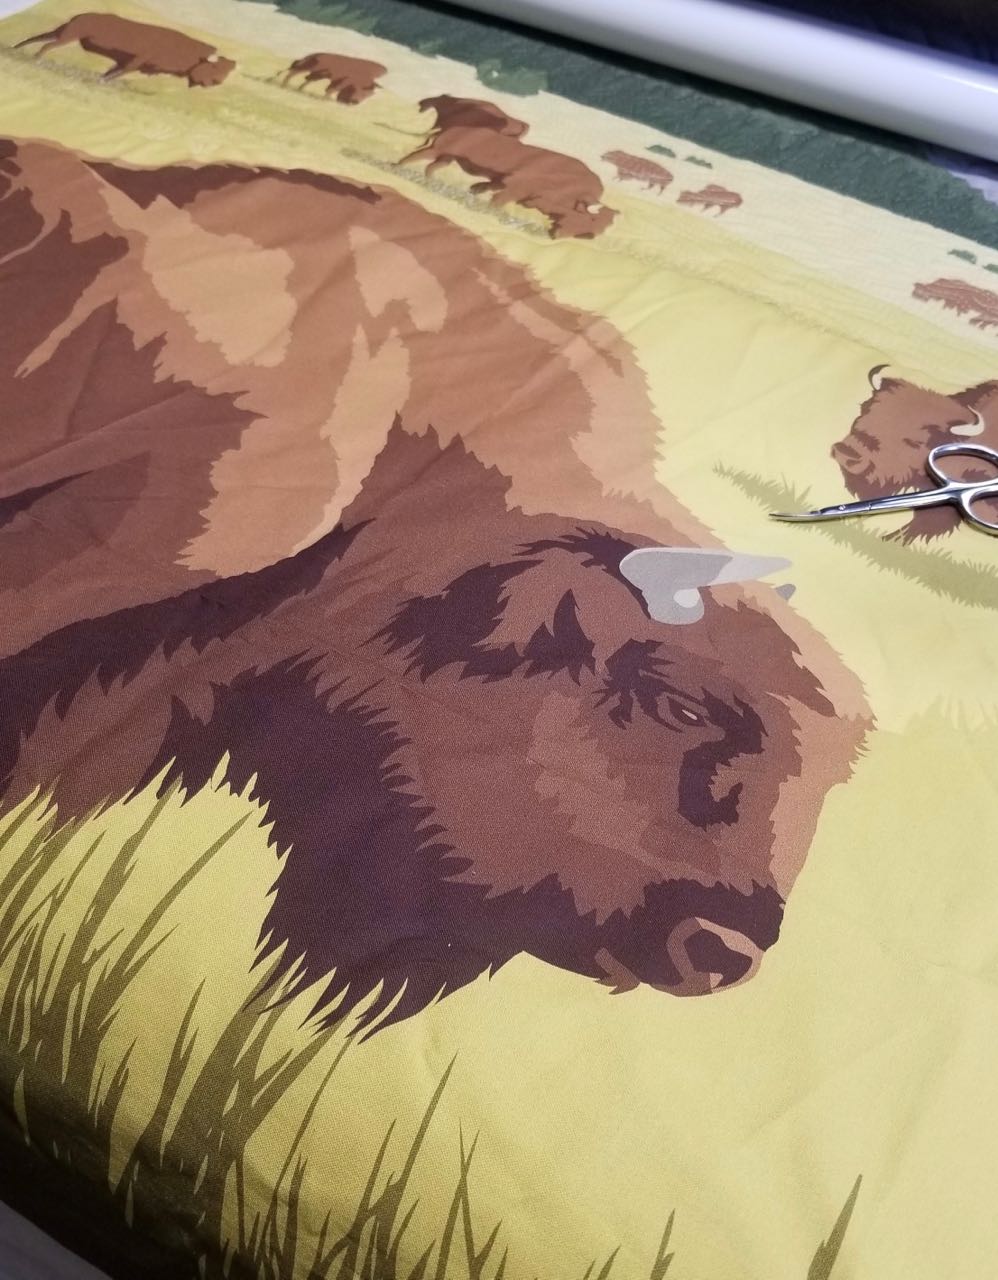
Tip #1 Use a panel or bold fabric print as the starting point.
Think of it almost like a coloring book, instead of staring at a blank page, it’ll be so much easier if there are lines for you to fill in. These National parks panels are perfect for this!
They have enough detail to give you a starting point, but not so much detail that you won’t see the quilting. After all, you kinda do want to see all the amazing thread you put on the quilt.
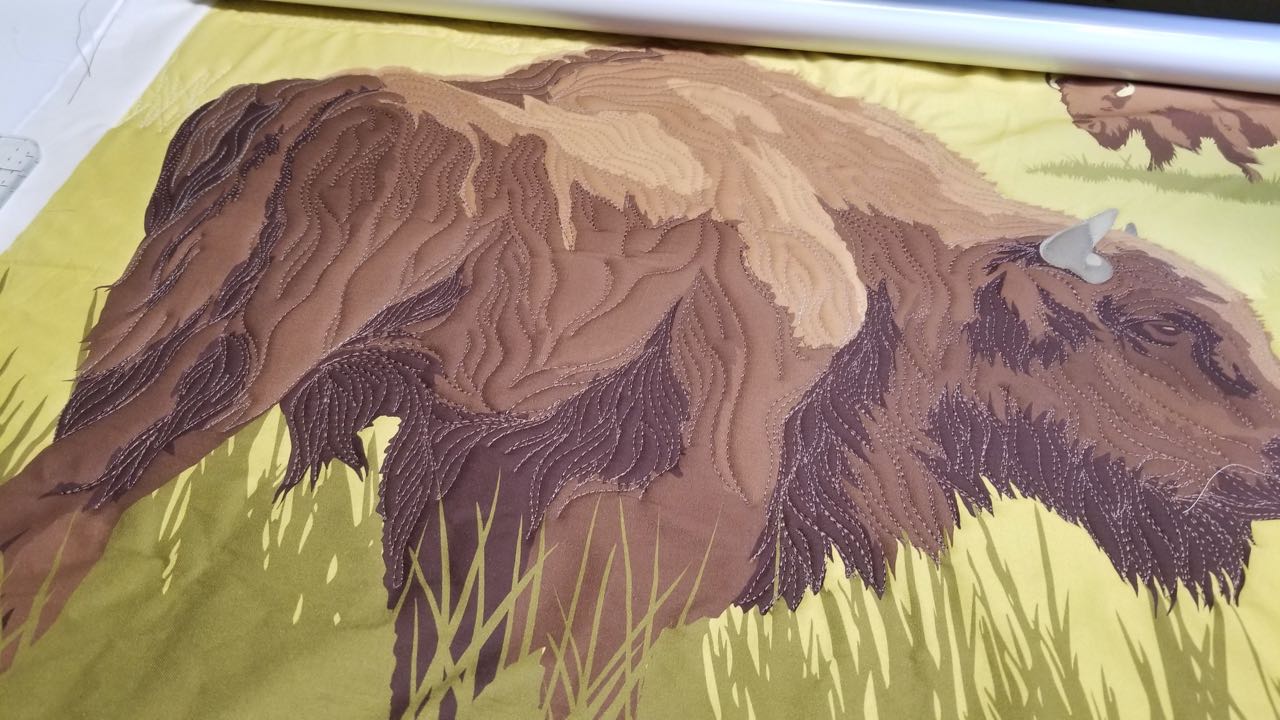
Tip #2 Start by quilting some guidelines
Using a thread color similar to the area you’re quilting, start by quilting some guidelines. These are the main lines that you will quilt around later. Don’t overthink this part. They don’t have to be perfect at all, in fact, sometimes, it’s better if they aren’t.
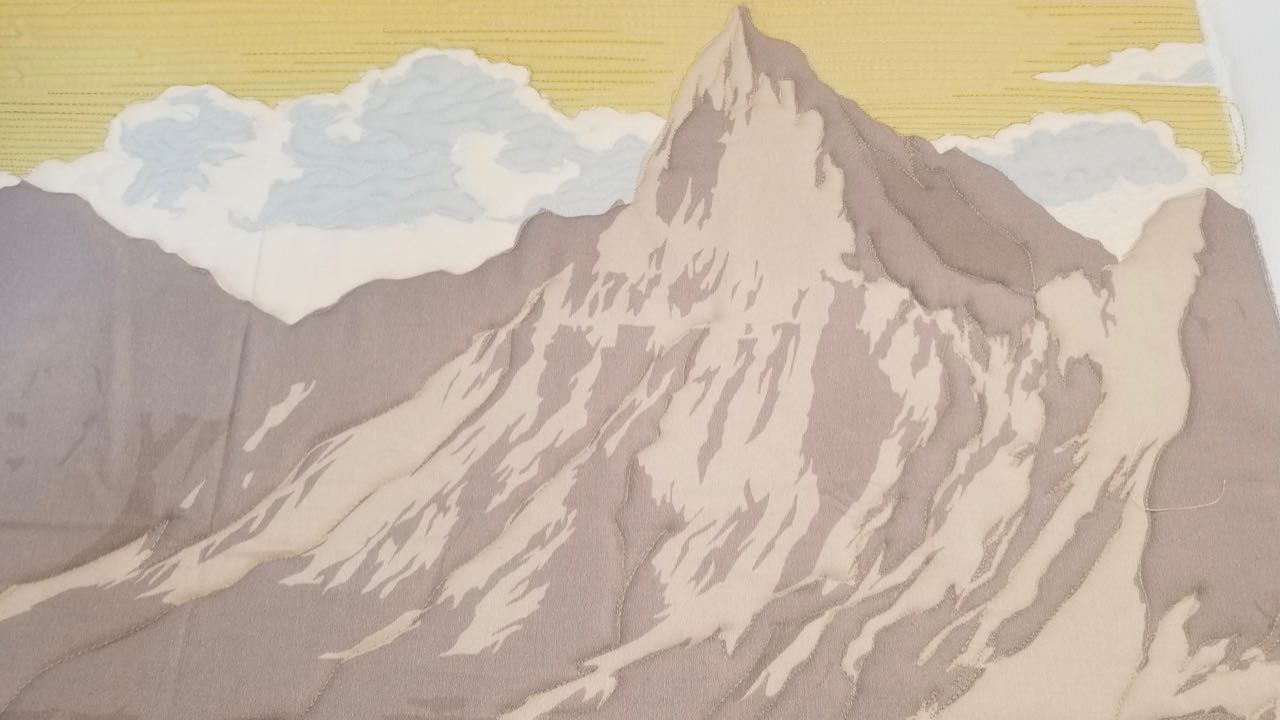
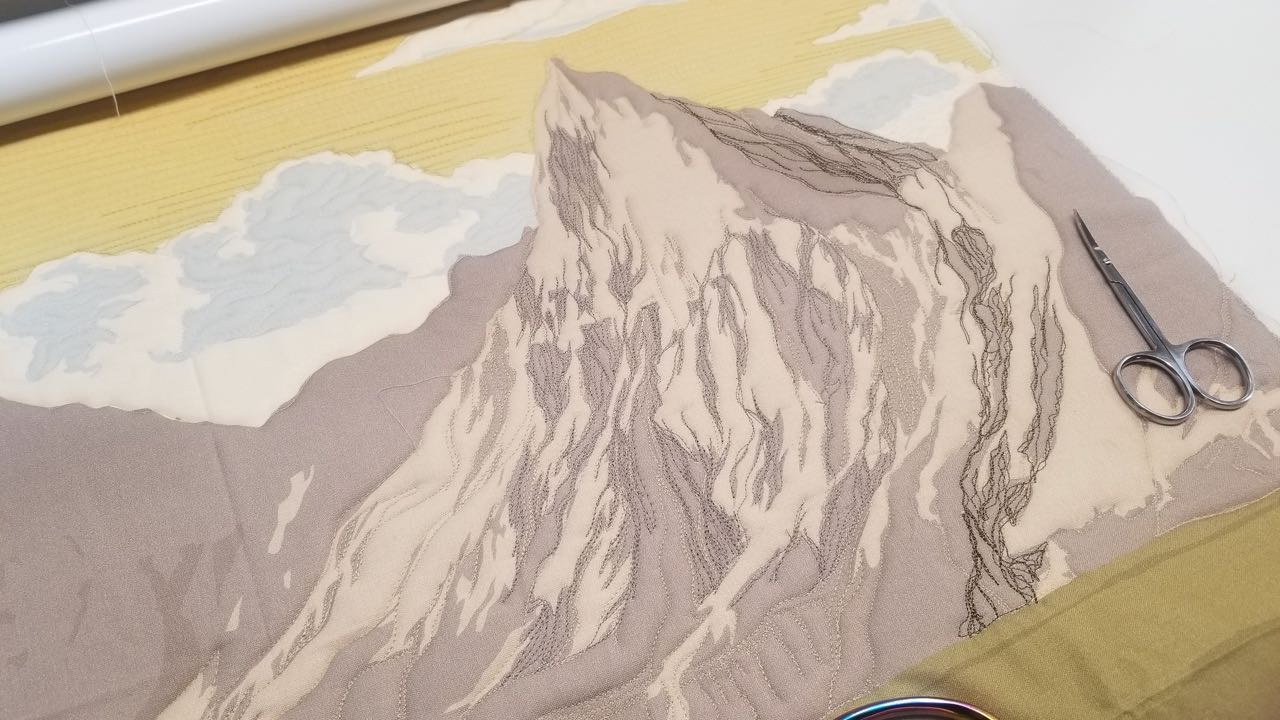
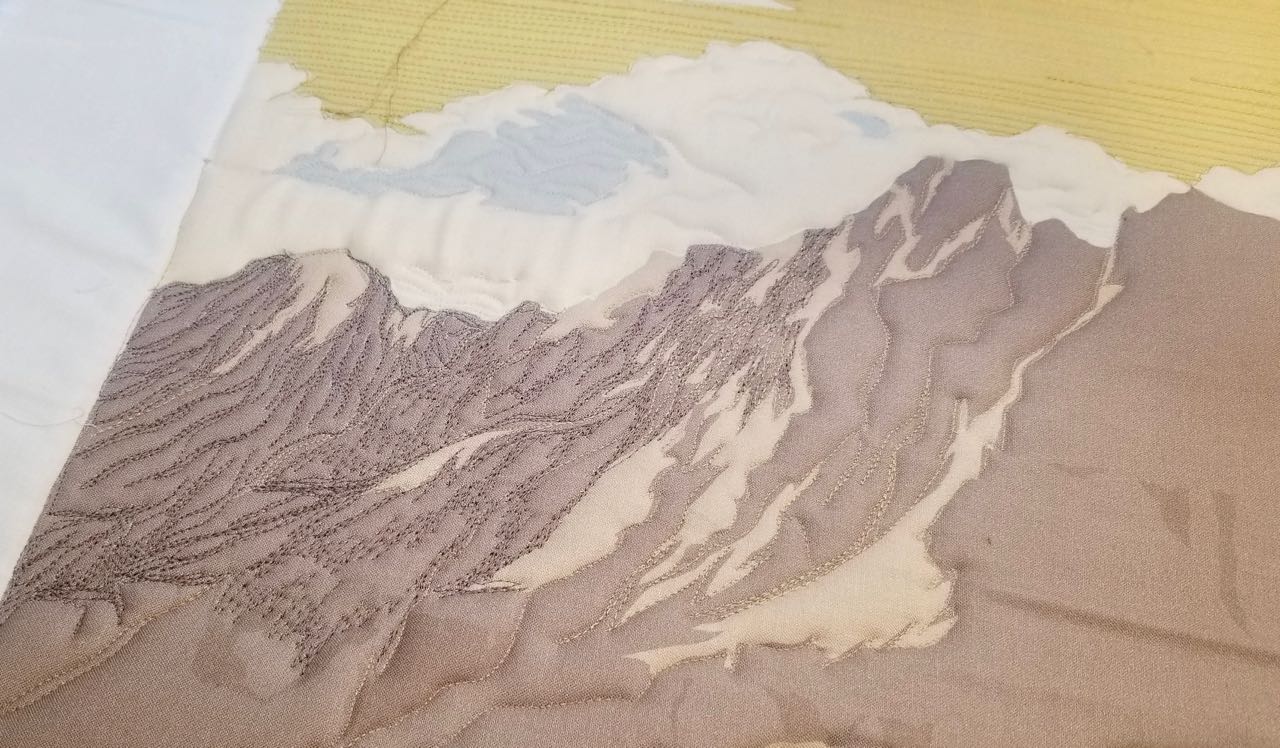
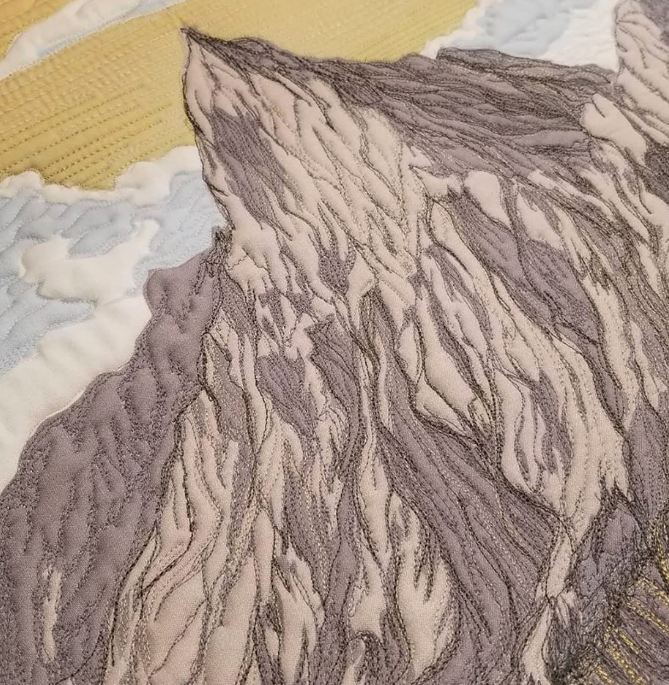
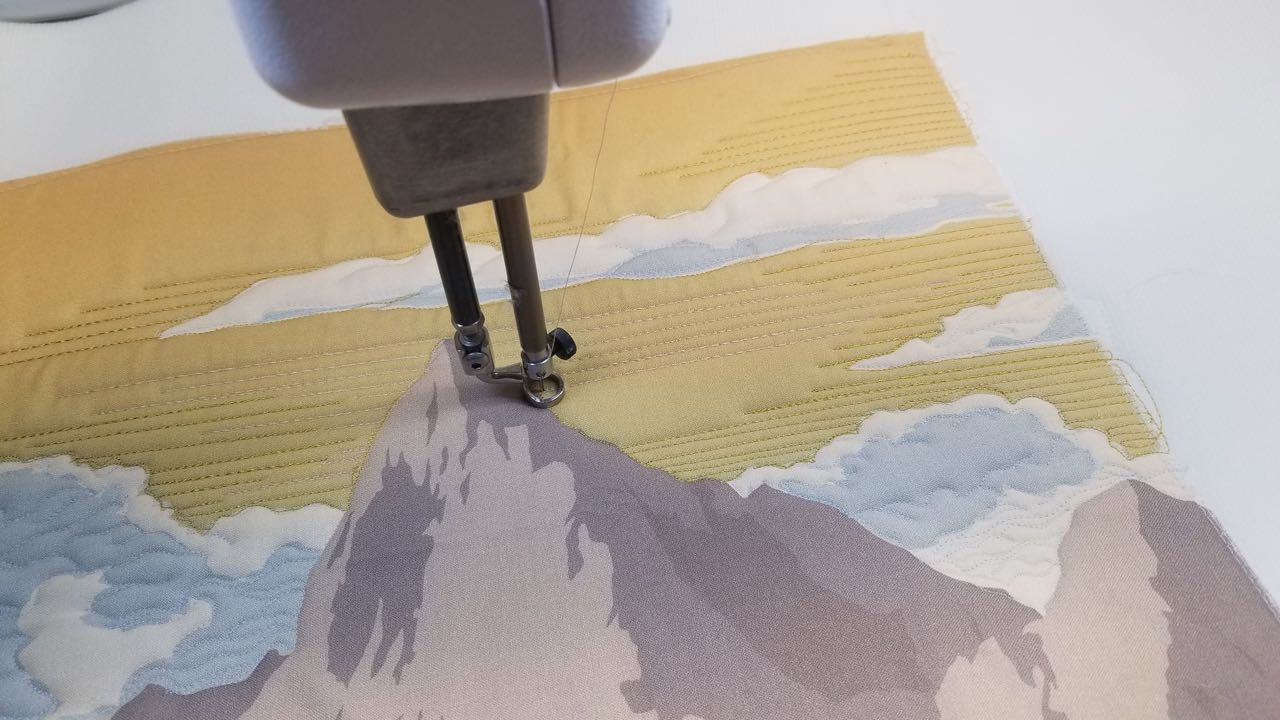
When quilting the Badlands National Park panel, I started by quilting along the edges of some of the colors. Then I added some of my own lines.
Using a thread color that is similar to the fabric will help you see the texture of the quilting without being overwhelmed by the quilting. It will also give you a chance to get “warmed up” to the idea of thread painting before you start using contrasting thread colors.
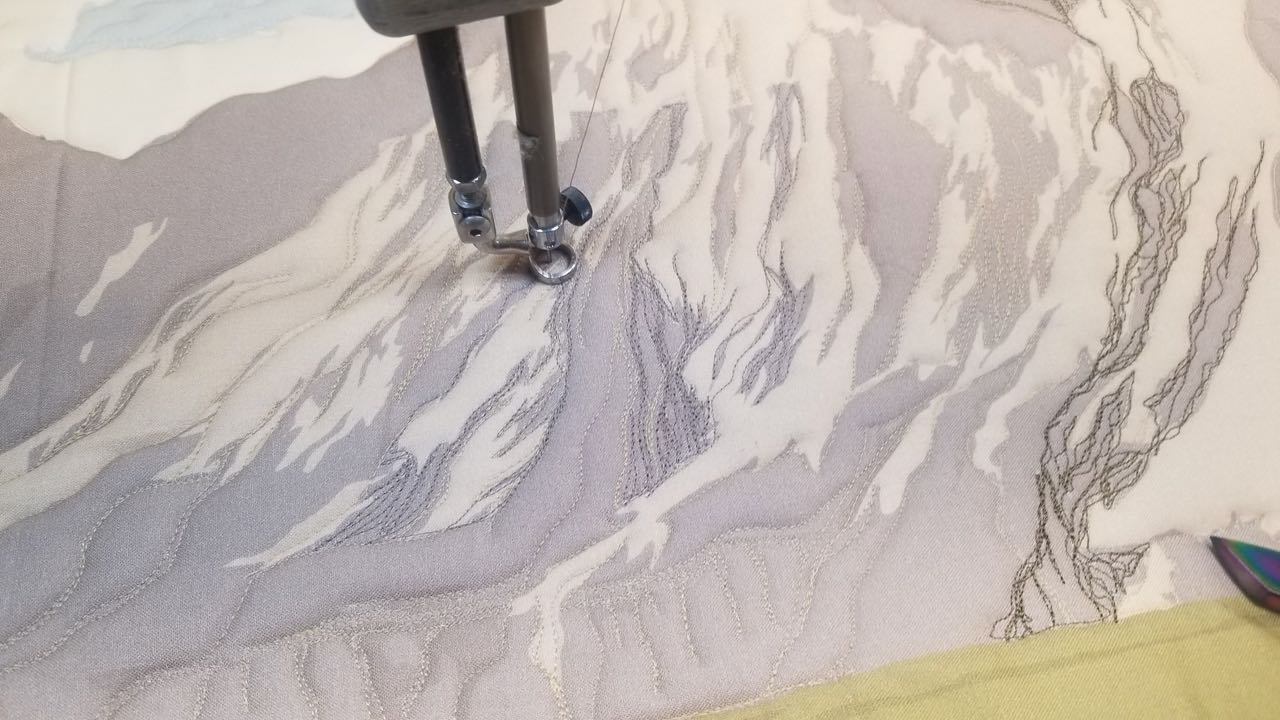
Once you’ve quilted the guidelines, start filling in around them with more quilting. Again, don’t overthink this! You might find it easier to think of this as thread “scribbling” instead of thread painting.
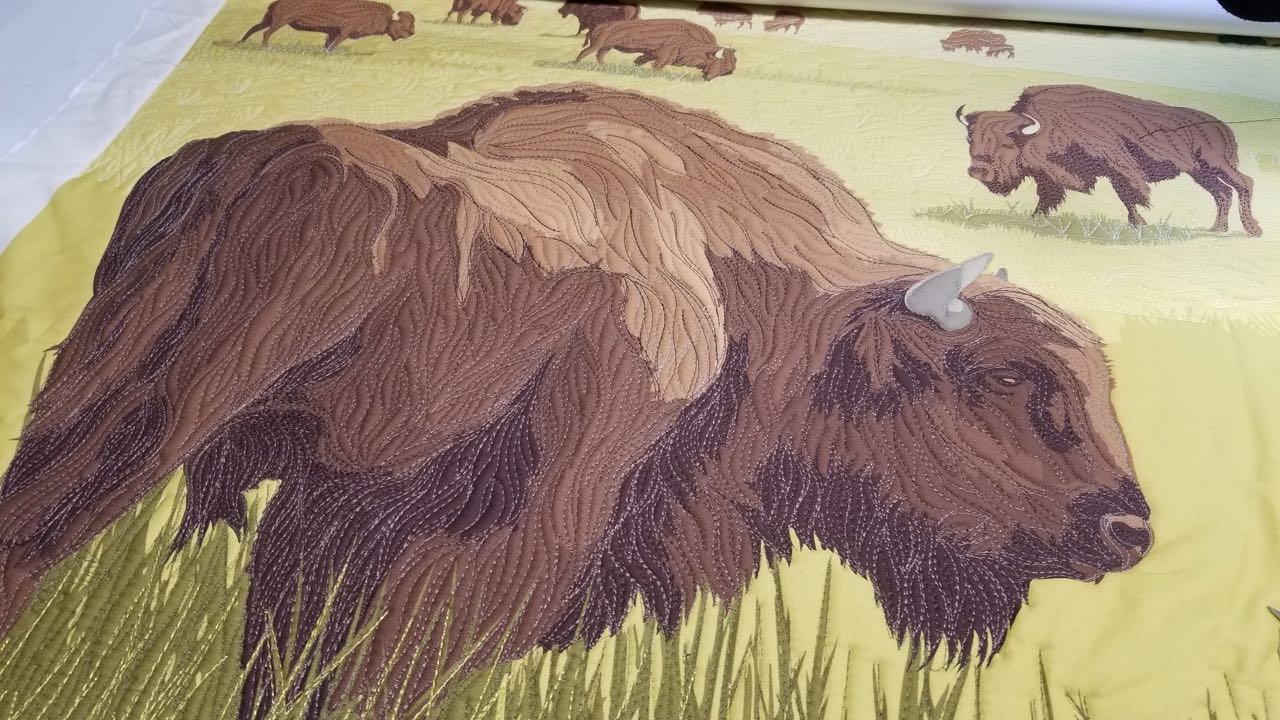
Tip #3 – Use Several Thread Colors
This is not the time to be shy about your thread colors! The more colors you use, the more detail and interest you will add to your quilt. Plus it can be a handy way to draw attention to some areas or away from others.
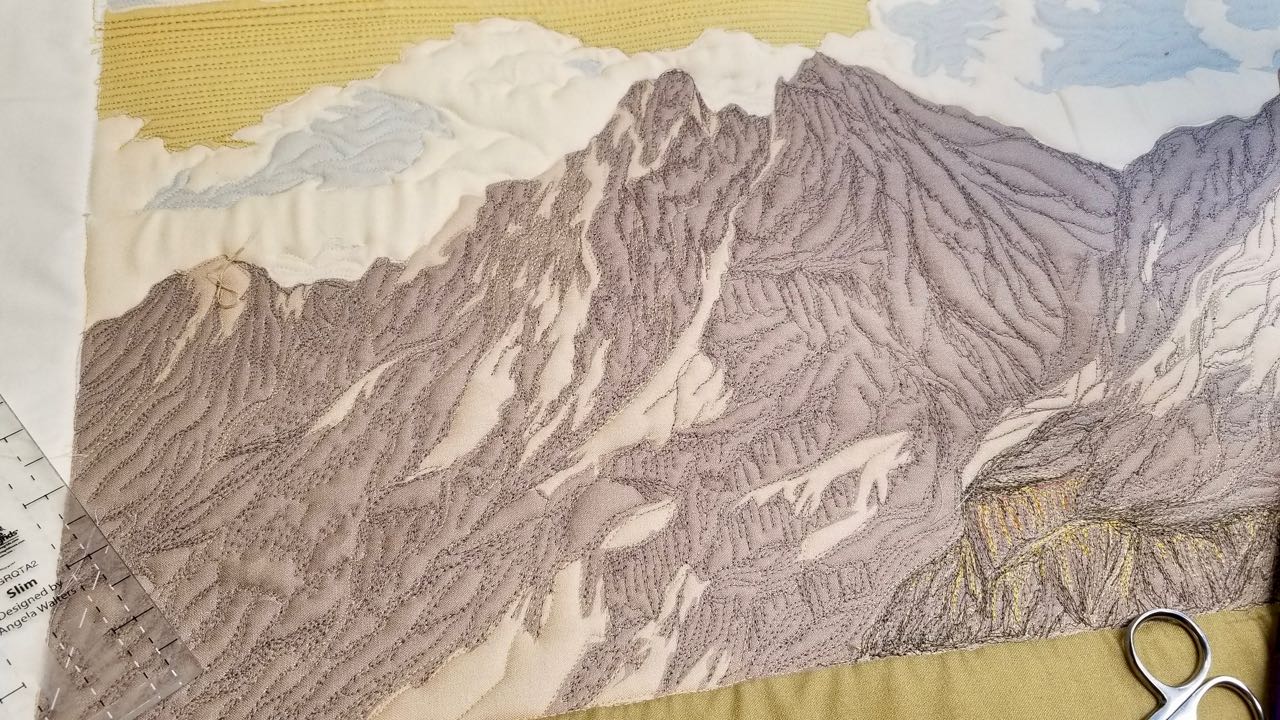
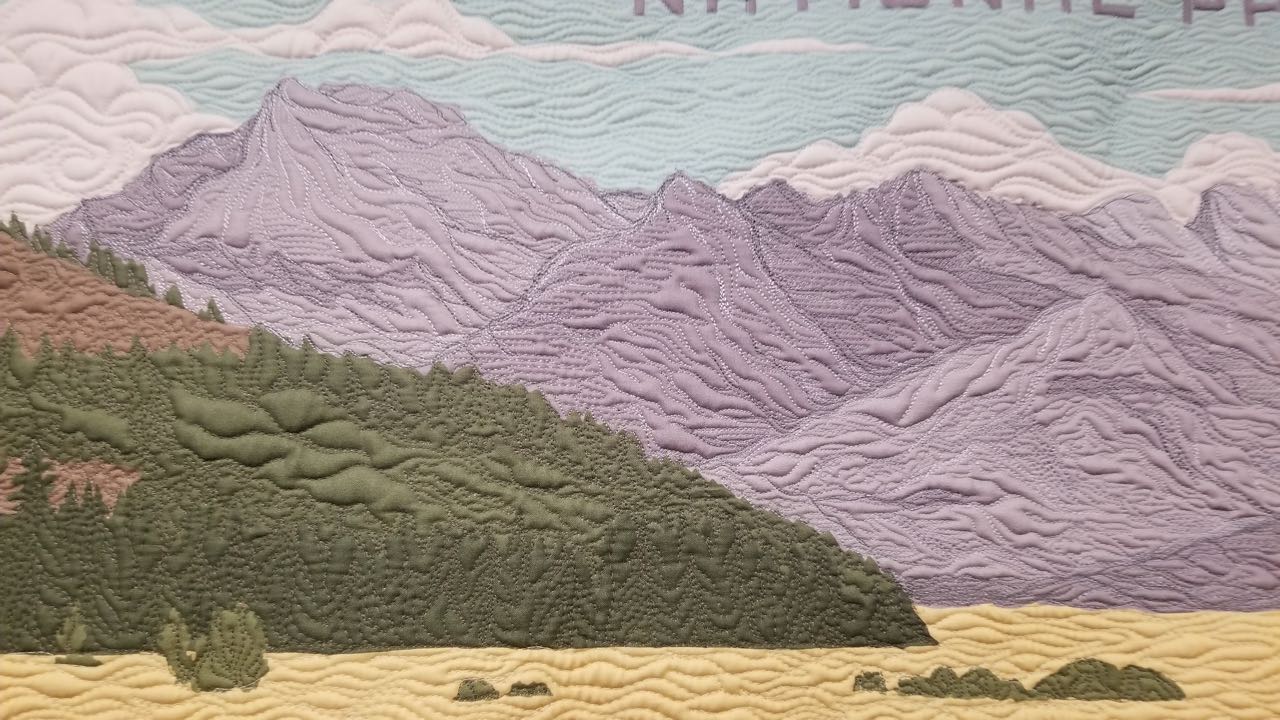
As I quilted the mountains, I filled in most of the area with different shades of tan thread, mostly using Superior So Fine thread (a 50wt thread that doesn’t have a sheen).
Then it’s time to add the wow!
After most of the area is filled in, use a couple of lighter and darker thread colors to really make the details pop.
I added some darker quilted lines to the mountain using Glide thread. Since it’s a 40wt thread with a bit of sheen, it stands out more than the So Fine thread.
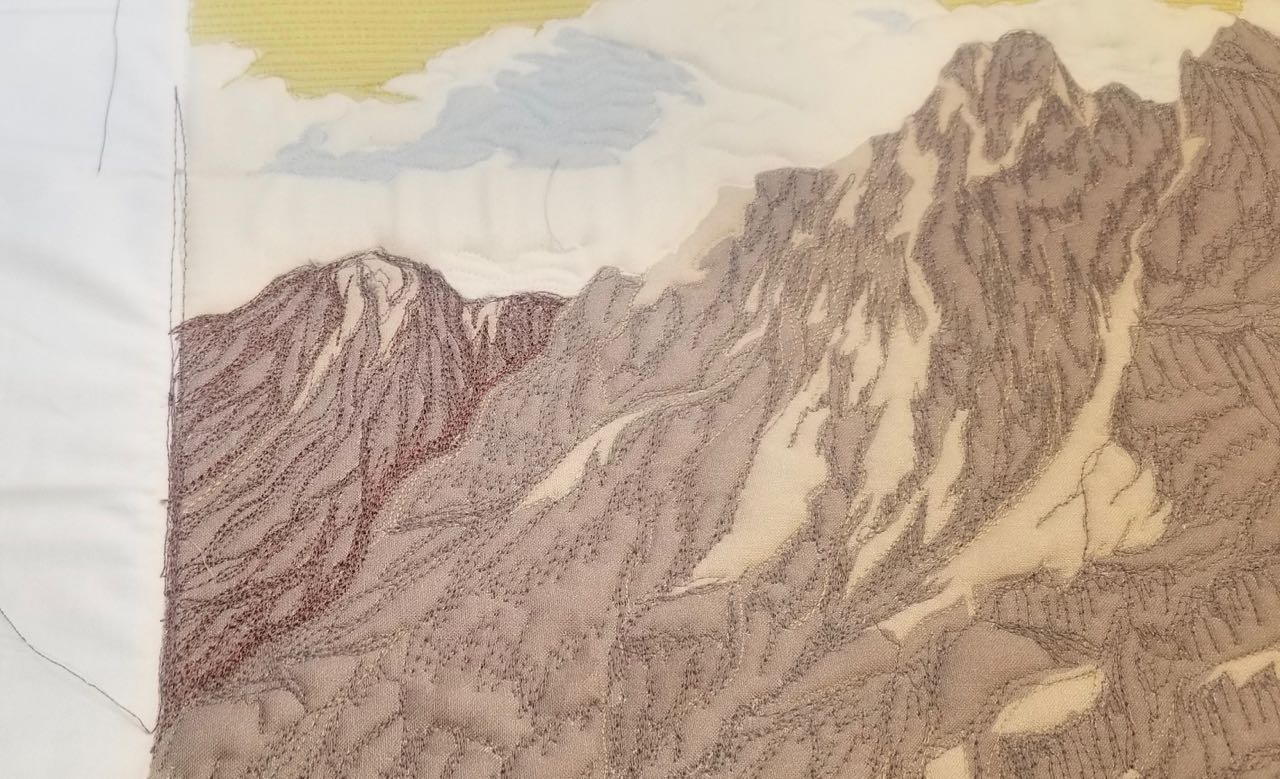
Here’s the good news: If you try out a thread color you don’t like, simply quilt over it with a different color. This is something I had to do a few times.
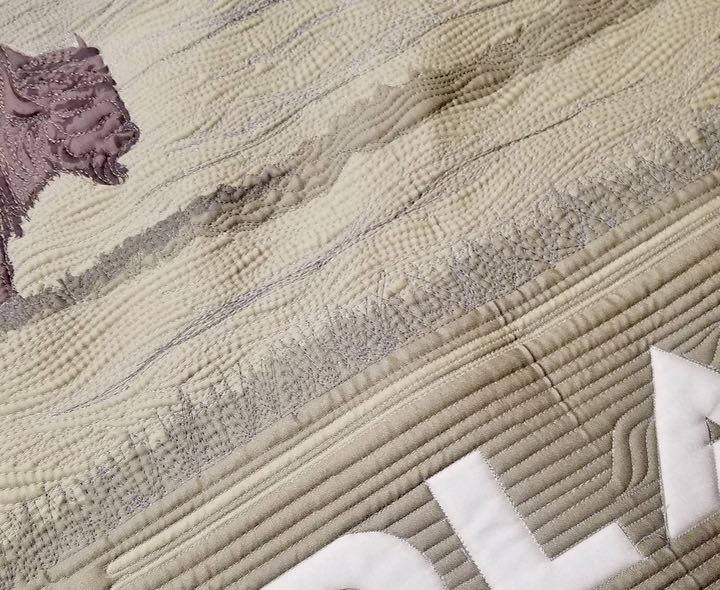
In addition to using several different colors, be bold with your thread color choices. Adding an unexpected color can produce beautiful results. I encountered this on a Yellowstone panel I was quilting.
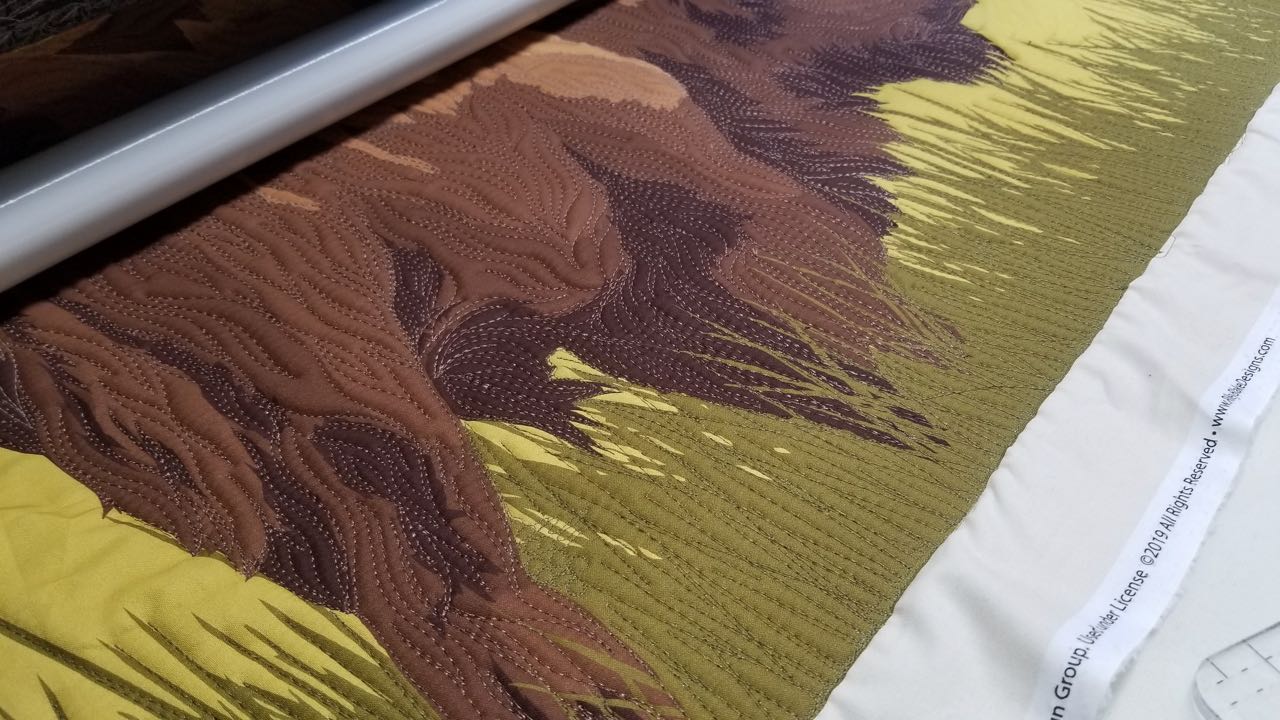
As I quilted the grassy area, I knew it needed a little something extra. I considered using a light green thread, then realized that shiny gold thread was even better.
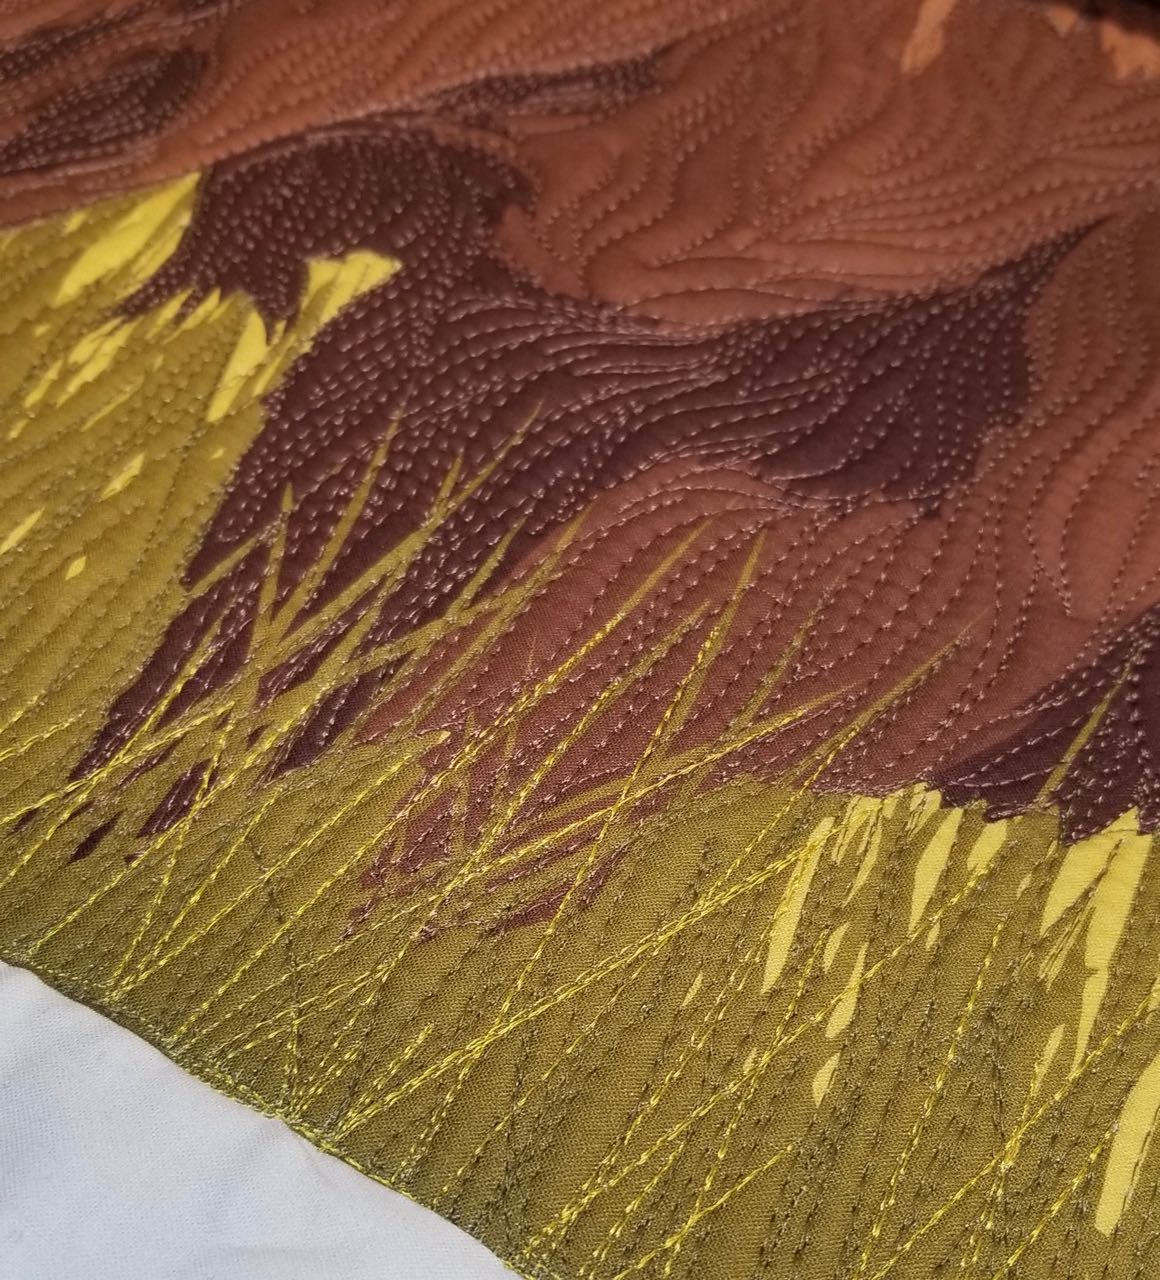
A little bit goes a long way to make the quilting shine!
Tip #4 Highlight one main element of the fabric.
Don’t feel as though every part of the panel has to quilted with tons of detail. Focus most of your effort on the main part of the panel and keep the quilting a little more basic in the rest.
On the Badlands panel, I felt that the mountain range was the most striking element, so that’s where I focused most of the quilting.
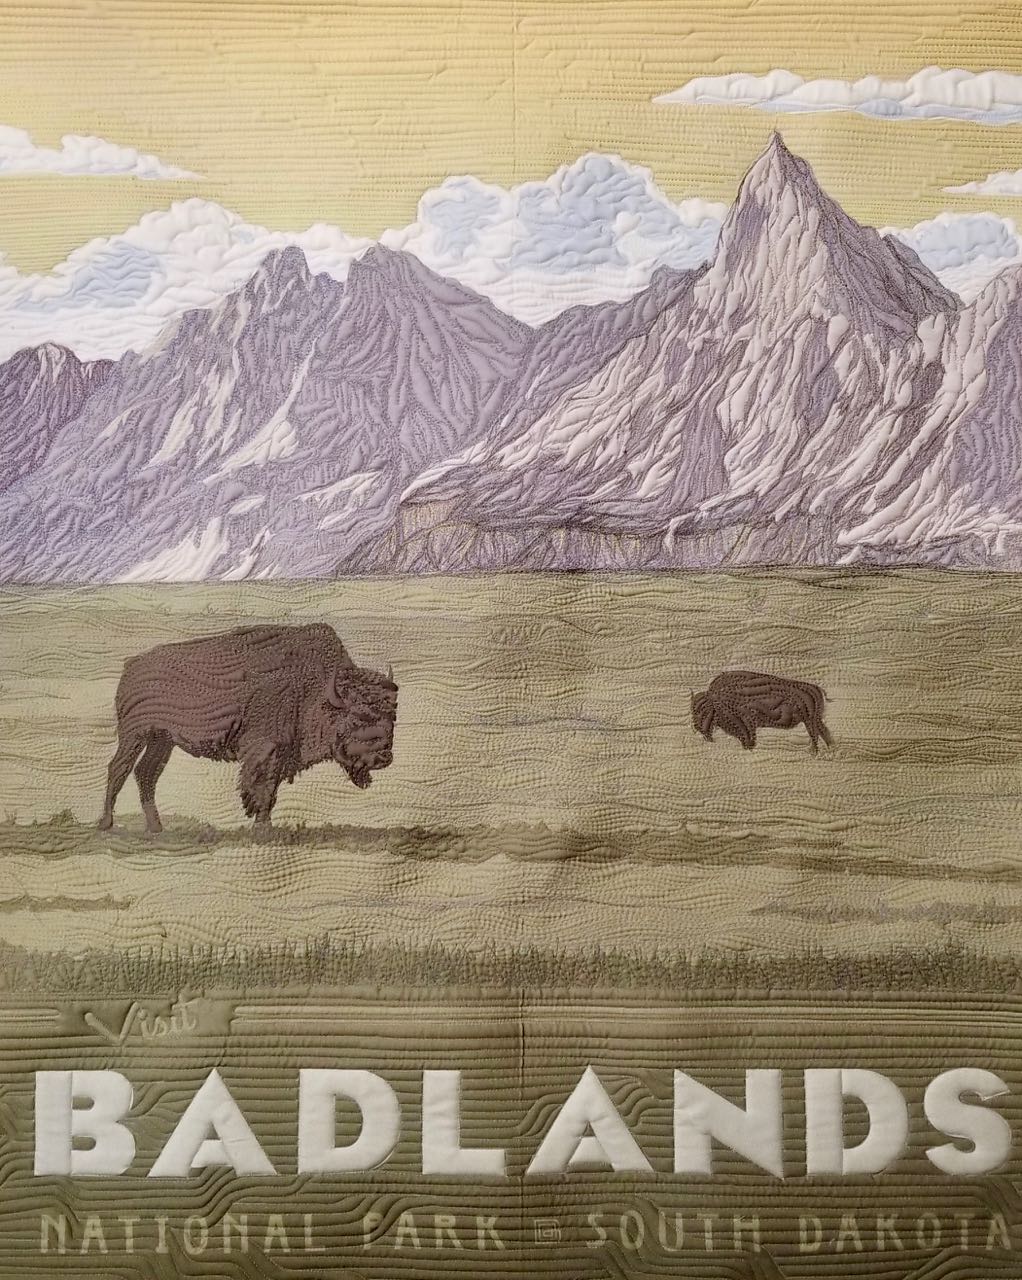
However, in the sky and the grassy areas of the panel I kept the quilting more basic.
Let’s compare that to the Yellowstone Panel that I also quilted.
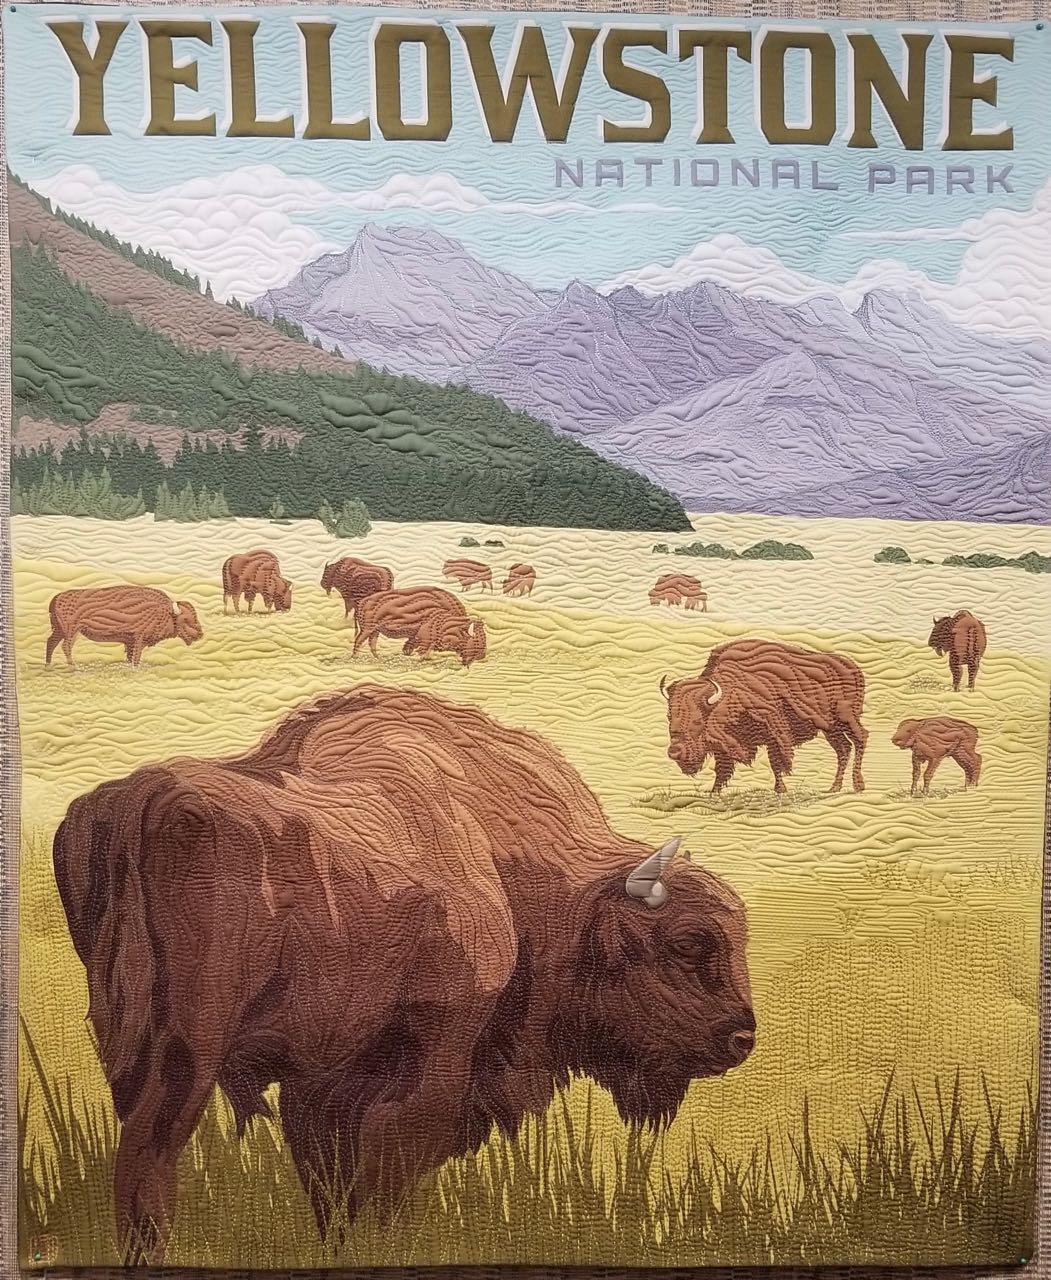
In this panel, I thought the buffalo was the most striking part, so I didn’t add as much detail in the mountains.
But once I started quilting the buffalo, I followed the same routine that I did on the Badlands panel. First quilting the guidelines, then filling in with different thread colors.
Your Turn!
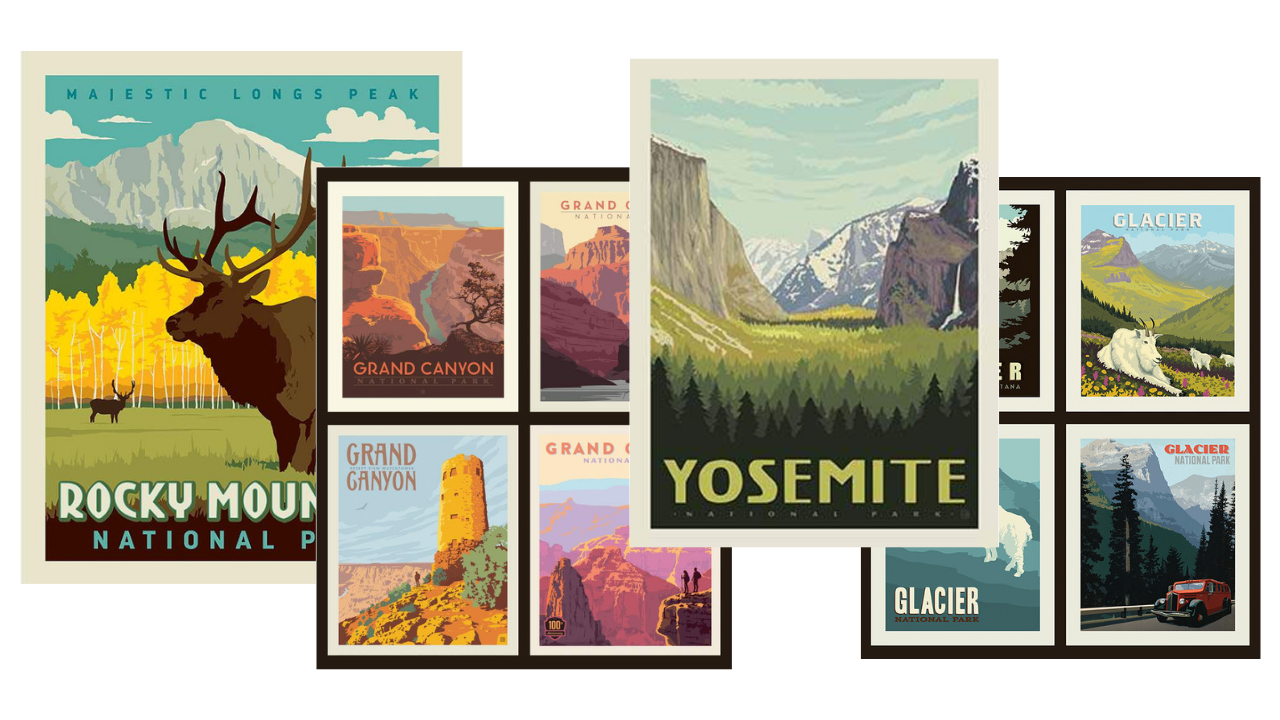
Hopefully, between the video demo and these handy tips, you will empowered to give this technique a try! To learn more about the National Parks panels, click here.
Questions or Comments?
Let me know what you think by leaving a comment on this blog post and I will do my best to answer it! Happy Quilting
Thank you a lot!
Why don’t you create tiktok profile if you know so much about painting? If you don’t know where to get followers just use this site https://viplikes.net/buy-tiktok-followers to buy it
I have never thought of thread painting, it was amazing to see how the picture changed
Thank you for this post. You can make video tutorial and post it on youtube. On this site https://viplikes.us I usually buy youtube views for my video. Use it too
Welcome to Hemp Life Mag! Our magazine was founded by a group of different like-minded people who are connected by a common interest for fitness and well-being.
Hemp Life Publication is devoted to delivering you the hottest and trending health and wellness quick guides, advice and tips, product reviews and news. At Hemp Life Publication, we are powerful supporters for the countless benefits of CBD and marijuana goods and feel that they can benefit practically anyone: even you! Thus, we like to take a hemp and CBD centric slant to popular activities and endeavors and illustrate how CBD can make every little thing better: from cooking food recipes to meditation and sex! At Hemp Life Mag, you will discover tonnes of free gifts varying from free audio meditation talks, cooking recipes and cooking manuals to fitness workout video presentations all produced with love and passion by our fantastic team!
Our crew of CBD lovers are constantly reviewing brand-new hemp and CBD brand names to deliver you unprejudiced and independent reviews and thoughts and opinions.
We are consistently trying to find people who share our interest for health and wellness and constantly welcome new bloggers with new point of views.
We hope that you will certainly find our magazine valuable!
Stay happy!
Hemp Life Mag – CBD Publication
I loved seeing how you picked your therad colors.
Most Ultra Powerful Business Website Scraper and Email Extractor – The only list building tool you will ever really need.
Phase 1: Create quality and accurate sales leads for your business particular niche with laser accuracy and on complete auto pilot.
Phase 2: Engage your B2B advertising and marketing strategies to get in touch with your leads through e-mail blasts, newsletters, telesales, social media sites and direct mail.
Phase 3: Transform leads into your customers, discuss contracts, make money and also continue scaling your organisation.
Business Leads on a conveyor belt.
Our internet site scraper and email extractor will enable you to produce niche targeted sales leads directly right into an Excel spreadsheet file on a complete auto pilot. Simply enter your key phrases, configure your setups and watch the wizardry take place! This is not yet one more scraper but a one-stop-shop for scraping and also extracting data from all popular online search engine, business directory sites, maps, social media websites and your very own website lists into a single Excel file with complete particular niche precision.
Here’s Just how the Wizardry Occurs
In simple terms, the software program will go out to all online search engine, service directory sites, Yahoo Maps as well as social media sites networks and discover as well as pull out information from sites matching your business particular niche utilizing a collection of proprietary filters as well as neural networks. It will then save all the extracted organisation contact information from all sources into a single Excel sheet. You can subsequently use these sales leads for B2B e-mail blasts, newsletters, guest posting outreach for link building and also off-page Search Engine Optimization, telesales, direct mail marketing and social media campaigns.
Scrape Company Leads with laser precision
One-Click Solution
Proprietary modern technology as well as AI
Discover more and download at https://cbtemailextractor.com
Is anyone here in a position to recommend Shapewear? Cheers xox
Hi Angela- great video and quilting! My daughter loves these panels and I have done many, she likes less quilting so they look more like puzzle pieces, I add density strategically cuz I like a lot of quilting. I find that on some of the panels the fabric splits and runs, especially noticeable in the dark areas-even with a new needle-use size 18 with glide or Floriani thread. Have you noticed this issue? I see some minimal in your picture of the gold grass on the buffalo.
Thanks for all the tips Angela! Yes, I’m having the same problem on the dark areas of my Zion panel. The threads are pulling and I have changed needles several times, using a size 18. What can we do to minimize it? The Zion panel is mostly dark!
Hi – have you emailed Riley Blake? I did and they basically said user error (a dull needle) but was not the case at all. Maybe if more people email them directly they will fix this issue on these beautiful panels.
It’s not just the panels. It’s all the fabric in the line.
I am so glad I found this video. I just read about your thread painting. I have done a couple of quilts that way. I feel that I may be using way more thread than I need to. I am excited to watch your video. I love thread painting and I love working with panels. My fingers almost itch to get started. Well I am off to watch your video. Thanks for all the info, and I love your rulers.
I’ve found this extremely usefull, thought it’s worth sharing:
https://wtvox.com/sustainable-fashion/how-to-build-a-minimalist-wardrobe-that-lasts-for-years/
Angela, I purchased the panel of all the National Parks but am stumped on how to quilt it. Do you have any suggestions?
Angela I love this video tutorial I have watched it like 3 times. I love all your tutorials and quilt alongs. I am thinking about ordering some of these panels and thread. I also have the Infinity machine and I love it. I noticed that you put the back fabric on the top rail. When I was trained on the machine they told me to put the back on the bottom top on the top. Do you put the back on the top when you float the top or does it matter which rail.
Angela thank you for this video. I make realistic landscape quilts and it is an agonizing process for me getting it exactly right with getting all the colors, details etc correct. That being said I can get it to that point BUT then it sits for ever waiting to be quilted. I realize that the quilting can make or brake it and it has taken so much work to get it to this point I don’t want to brake it. I maybe only quilt a quilt once a year so I’m not good at it but most professional quilters don’t know how to quilt a landscape they usually quilt traditional quilts so I have to step up and do it myself. I just finished one in February that had sat ready to be quilted for three years. The thing I learned most by watching your video was how many times you went over the same quilting lines. It really emphasized the lines. I would really like to see you do the grasses. I was surprised looking at the picture that the background is horizontal and then the foreground is vertical which was expected. I also need to know more about prospective in quilting foreground and background as you get closer to the mountains etc. another thing I have had to do is making terrain look realistic when it is pretty much all the same color such as when it is snow or all green grass. I have NEVER seen anyone address any of these questions and those are the things I agonizes over. Thank you again for this WONDERFUL VIDEO.
What type of batting do you use? 80/20 ctton/poly? 100% cotton? Wool? 100% cotton is so flat you don’t get much dimensional effect when quilted.
I had a panel quilt loaded when this video came out. It has a big beautiful Mountian, valley, trees, grass and horses. With your help and tips I quilted it to pieces and I think it came out beautiful, but now a giant wall hanging. Lol
Stunning! And you’re so helpful with all the pictures and hints. Thank you. It’s my next project after the current Challenge. 🙂
The Badlands panel looks more like the Tetons in Wyoming than the Badlands in South Dakota.
Do you stabilize the top so that it doesn’t pucker
When thread painting do you layer it like a quilt, with batting and backing? Any stabilizer?
It turns out that I was doing this already on a Zion National Park panel for my son about the same time you started. I didn’t quilt as densely but can easily see its advantages. I, too, found this panel the perfect canvas for FMQ in a new way. Dare I say great minds think alike?
Thank you!!!! I have always wanted to try this. I am going to watch your video and go for it!
I got the Glacier panels and what fun! I’m painting it to death and learning so much. I go back and watch your utube on the Yellowstone panel. I get lost on whether to go up and down or across. This new tips will help. As everyone I appreciate your help and your utube videos. Sharon from Montana
Guao! Que efecto tan hermoso! La persona que creó el panel, muy seguramente no se lo imaginó así. Gracias por los tips. Tengo varios paneles abandonados porque nunca sé qué hacer con ellos. Esta técnica me encantó y además me parece que es entretenida de realizar. Gracias por compartir esos valiosos tips. Saludos desde Venezuela